the OSDR Curation team at arc-dl-osdr-data@mail.nasa.gov .
Data Submission Guide
Summary of guidelines for Data Submission to OSDR
”https://genelab.nasa.gov/guidelines-data-submission-osdr”
Welcome to the Open Science Data Repository (ODSR)!Below you will find guidelines for submitting space biology data.
Step 1: Review a Dataset
First, review one of the existing datasets in OSDR to become familiar with the format: OSD-48
Step 2: Create an Account
Follow these instructions to create an account to submit data in the OSDR Submission Portal, the Biological Data Management Environment (BDME).
Step 3: Review Submission Tutorial
Before submitting your data, review this tutorial on BDME data submission.
Step 4: Create a Study
Following the tutorial on BDME data submission, create a study or studies.
NOTE: If you have a NASA-funded study, and you have not yet filled out a Research Data Submission Agreement (RDSA), please contact Danielle Lopez at danielle.k.lopez@nasa.gov. Your RDSA will be used to create your study. If you already have an RDSA, your experiment record will have a study associated. You can create more studies as needed.
Step 5: Enter Metadata and Upload Data Files
OSDR organizes metadata into sample-level information and assay-level information. Data files are uploaded into the workspace and can be associated with each study.
Option 1: Enter your metadata and upload files directly to BDME User Interface. Once completed, follow the instructions in the tutorial to submit your study to OSDR Curation for review.
Option 2: Use the templates below to enter your metadata and submit the completed sample-level and assay-level metadata files to OSDR Curation at arc-dl-osdr-data@mail.nasa.gov. Upload all data files to your workspace.
Below you will find a sample-level metadata template and assay-level metadata templates for the most common assay types. Use these to properly format your data prior to submission. If you don’t see your experimental assay in the folder, please contact us so we can add it.
”https://drive.google.com/drive/folders/1wETFFf4MVoyGToAdmDh1nP7laNTKZvtt”
When possible, please use common acronyms as defined on the OSDR Abbreviations Page. If your data has acronyms, scientific terms, or column names that need to be defined, please include a data dictionary. An example data dictionary can be found in dataset OSD-618 (Files > Novel Object Recognition > Data Dictionary Files).
Data Submission Portal
The Biological Data Management Environment (BDME) is a web-based system that accepts submission of omics data from space-relevant experiments including spaceflight, radiation, simulated gravity, gravitropism, isolation and confinement, hostile closed environments and/or distance from Earth. The OSDR accepts studies whose design, assays and data types match those listed in the homepage, if yours is listed then please contact our curation team to help us add it.
Instruction on how to create a NASA Guest account to access the BDME
Logging into BDME:
”https://osdr.nasa.gov/bio/submission-sso-login.html”
Create a new account./ If you already have an account login.
You will receive an authorization email with the subject of the email is “[NASA Guest] Complete your Guest account registration”. Follow the link in the email to set up an account password. * If you have registered in GEODE before, please make sure to use the same gmail address so you can access your existing studies/files.
Set up an account password. Your password must be 12 to 32 characters long, it must contain all three of the following four constraints, at least one upper case character, at least one lower case character, at least one number, and at least one special character (e.g. $, !, #, *, @, %)
The next screen will confirm that a link is sent to the email to complete registration.
Log in using your email address and password. ** If you forgot your password please select the “Reset Password “ option.*
Or if you have one use your NASA account to automatically log in.
In the access LaunchPad page, select Agency User ID. Then use your registered email address as the Agency User ID and the password that you just created.
The` OSDR data submission console <https://osdr.nasa.gov/bio/submission/console> will open and provide access to tools to help you submit your data.
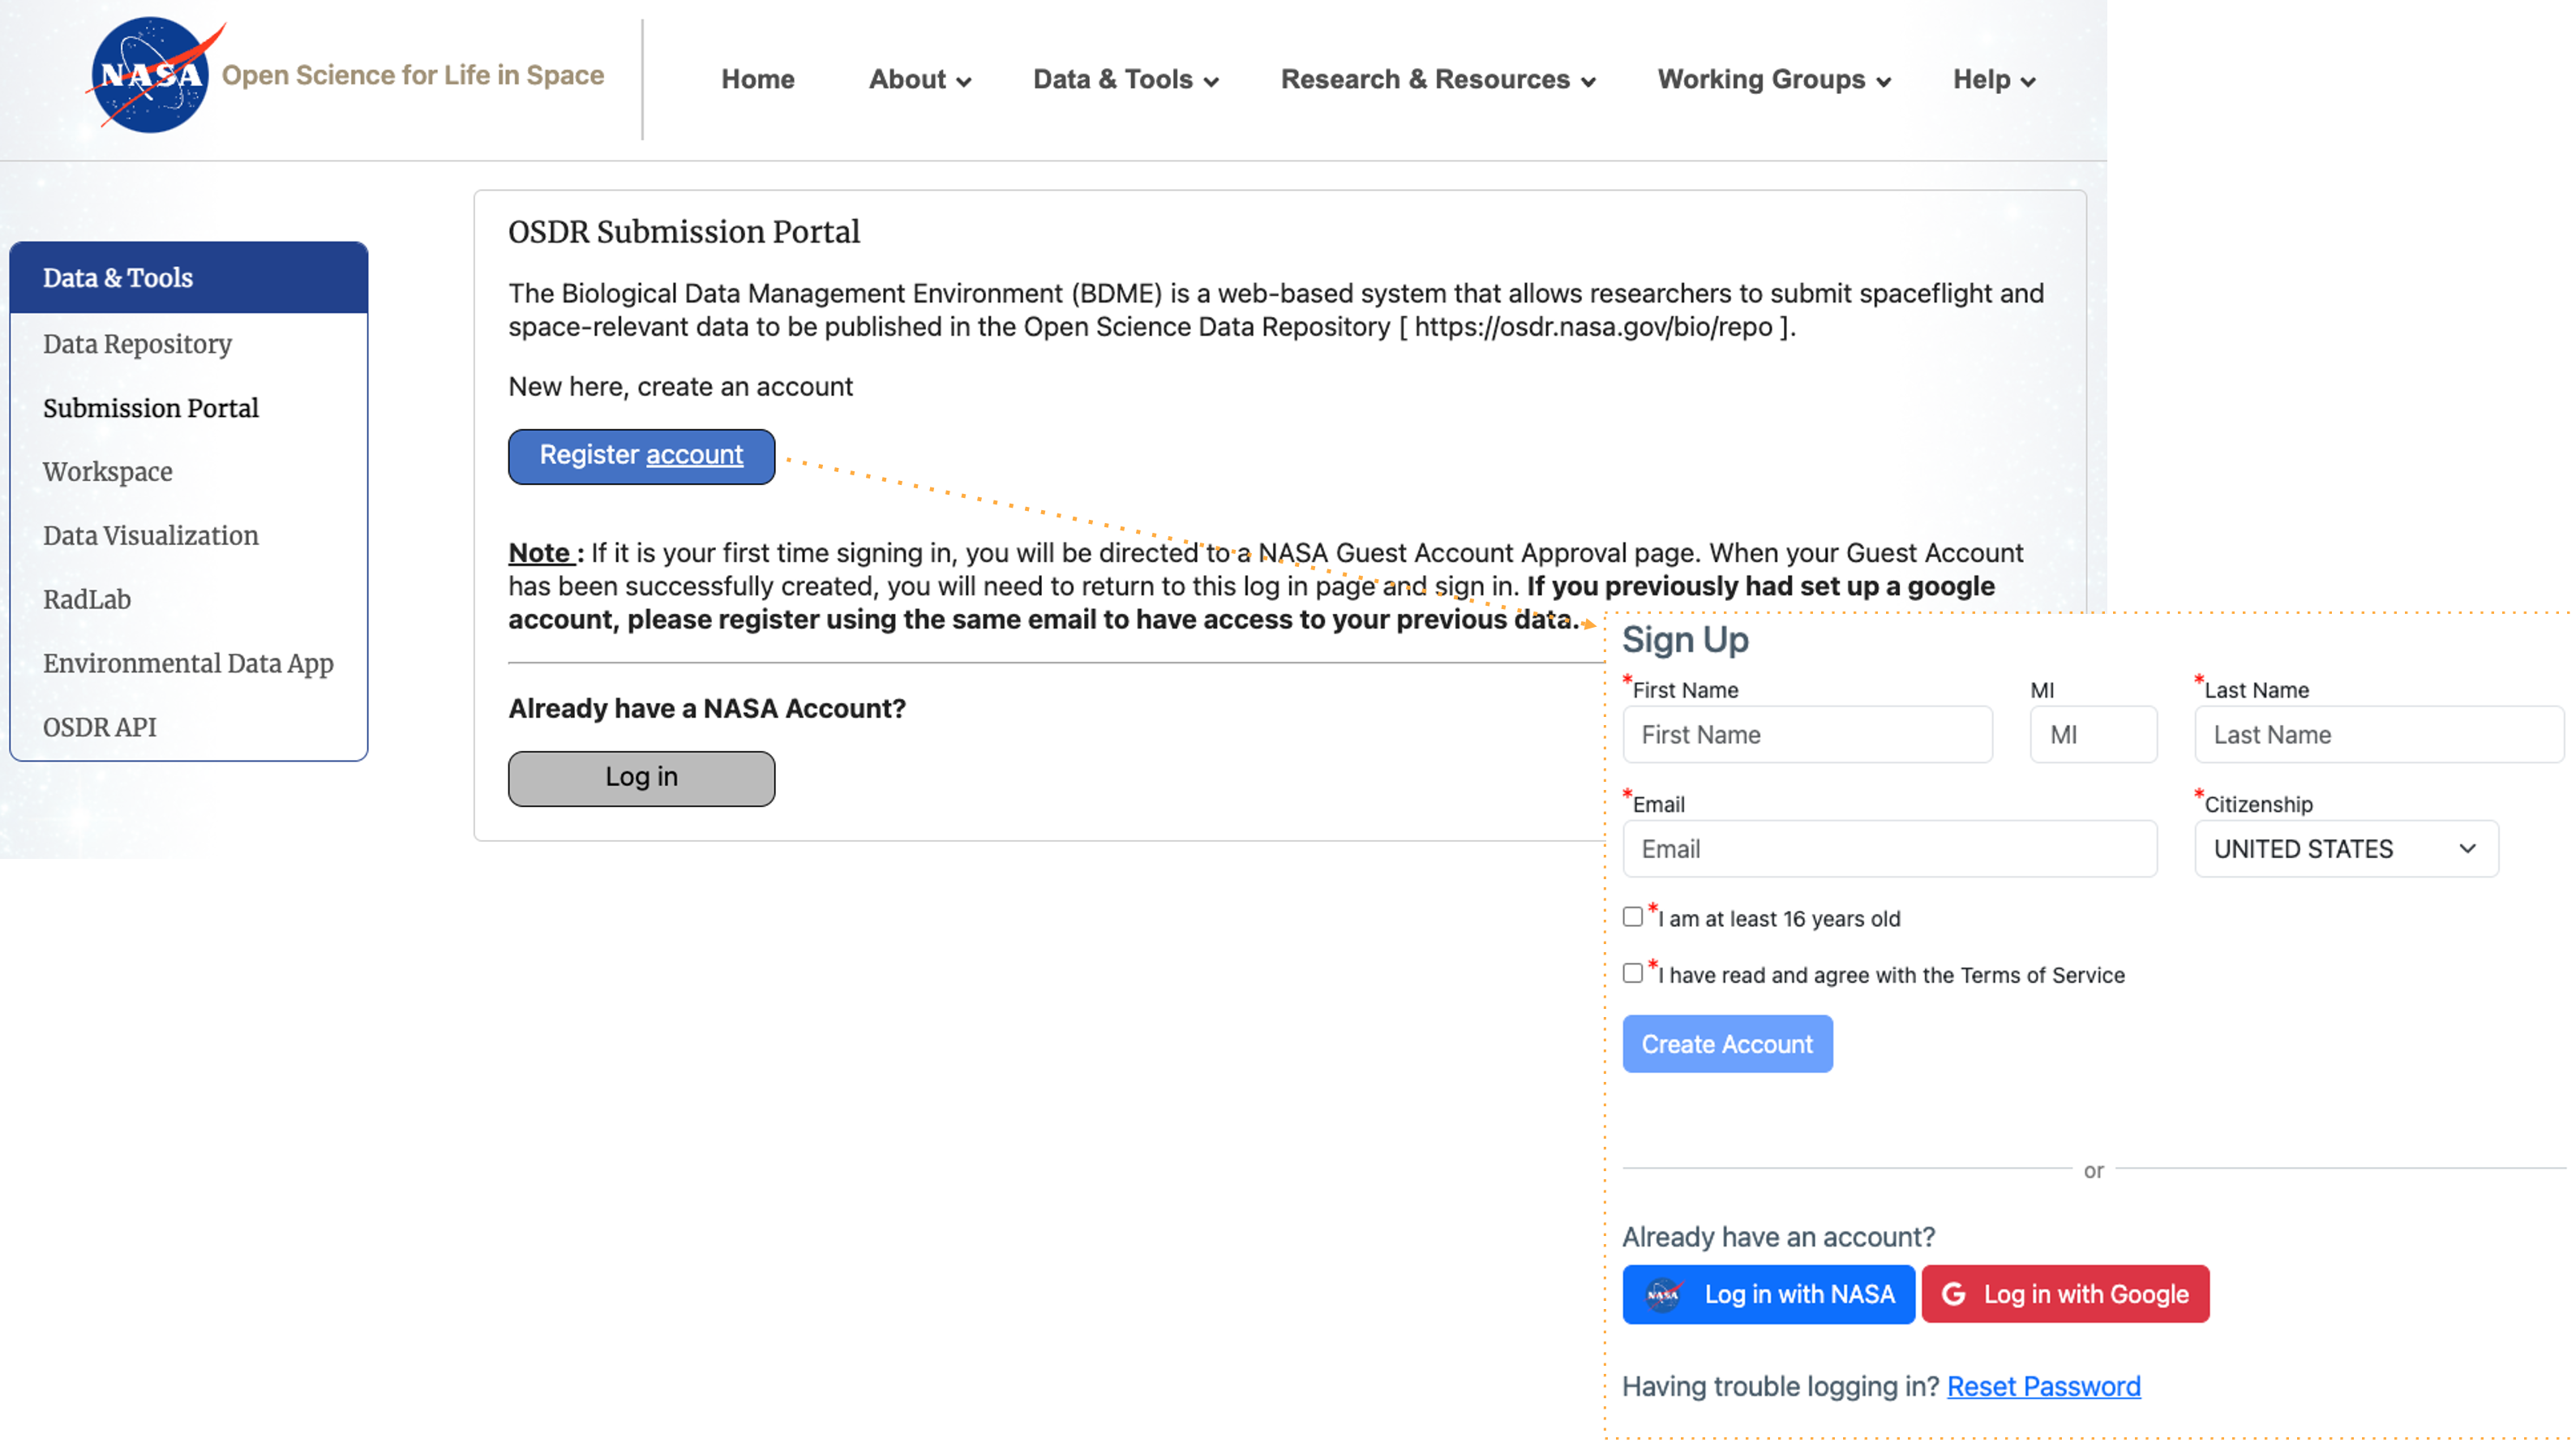
Screenshot showing the login or register account options that provide access to the OSDR submission portal. A yellow arrow highlights the sign-up window that will open to help you create a new account. This will then launch the Guest Account Services window that will prompt the user to provide a password before creating an account.
OSDR submission console
Logging into your OSDR submission console allows you to see what studies you have previously loaded  
”https://osdr.nasa.gov/bio/submission/console”
When you see “My Studies” page, you have logged into BDME successfully.
More detailed instructions can be found here
Features of the data submission console:
The OSDR homepage, data repository, workspace, tutorials, and support resources are all accessible through the OSDR interface. The workspace allows users to manage files, while the tutorials guide on using OSDR. The FAQs, troubleshooting tips, and contact information assist with resolving any issues or inquiries.
The top bar menu shows links to the “OSDR home page”, “data&tools”, “Research&Resurces”, “Working Groups” and “Help” menus.
GEODE my dashboard button can be used to refresh the results page.
“Create new study” – link that allows users to create a new study while incorporating experimental factors. You can find a tutorial on how to submit data through GEODE.
My studies – allows users to view current studies submitted via GEODE, users can exit using the “logout” link or by closing the browser tab.
Summary - enter some text that summarizes the study being added to or found in the OSDR database.
All: shows data that is in various stages of submission.Submitted: The link allows users to see only data that has been submitted.In Curation: The link shows only data that is in curation.In Review: This link allows users to only see data that is in review.
.png)
Screenshot of the OSDR home page. It has been labelled 1 to 5. The first #1 highlights the OSDR navigation panel, #2 highlights the dashboard refresh button, #3 highlights both the create new study and help panel links. #4 highlights the studies being processed and the #5 highlights where the summary information can be found for an example study.
Biological Data Management Environment (BDME) Tutorial
To create a study use the following instructions (BDME data submission tutorial)
”https://genelab.nasa.gov/sites/default/files/2024-01/BDME%20Tutorial_v3_noLoginInfo.pdf”
How to create a new OSDR repository
1. Click on the “Create New” button 
2. Select “Create a Study”
In this example the data is not from a NASA-funded grant, which is highlighted in blue, so the user can click “Next” to create the new OSDR-# accession.
.png)
Screenshot showing the welcome page to the guided submission portal.
“Select factor”
3. Choose a factor: The drop-down list that best describes the subject matter of your study and then click “Let’s get started.” If a pertinent factor is not listed, click on “Other” to email the curation team for review.
In this example, the user has selected “Gravitropism”.
.png)
Screenshot showing the Factor option stage during the guided submission portal.
4. There is nothing to do at this stage of the guided submission.
At this stage click “Let’s get started”
.png)
Screenshot showing the welcome page lets get started.
“Raw data can be uploaded later.”
5. Raw data files are required: as they are best for downstream analysis and modeling. Uploading raw data files can be done at any time, so you can select “I will upload files later” and click “Next” for now. This system lets you upload files easily and provides the flexibility to do it later if you want. But remember, the files need to follow certain metadata rules and formats to make sure they’re compatible and can be processed quickly.
In this example, we’re selecting “upload files later” so we can get familiar with the system before uploading our results and raw data.
*Alt text: Screenshot showing the I will upload files later stage at the initiation of a new study._
“Create a new OSD-# and DOI”
6. Create a new study, OSD identifier and DOI: Creating a new study will provide you with an OSDR accession number and a unique DOI are assigned to your study that can used when submitting papers for peer review. When you see this screen, a new study has been created successfully and you can start curating your research for greater integration into the OSDR metadata matrix.
In this example screenshot shot you can see how a new study is given a unique OSD ID number and data set DOI which can be used to reference the dataset.
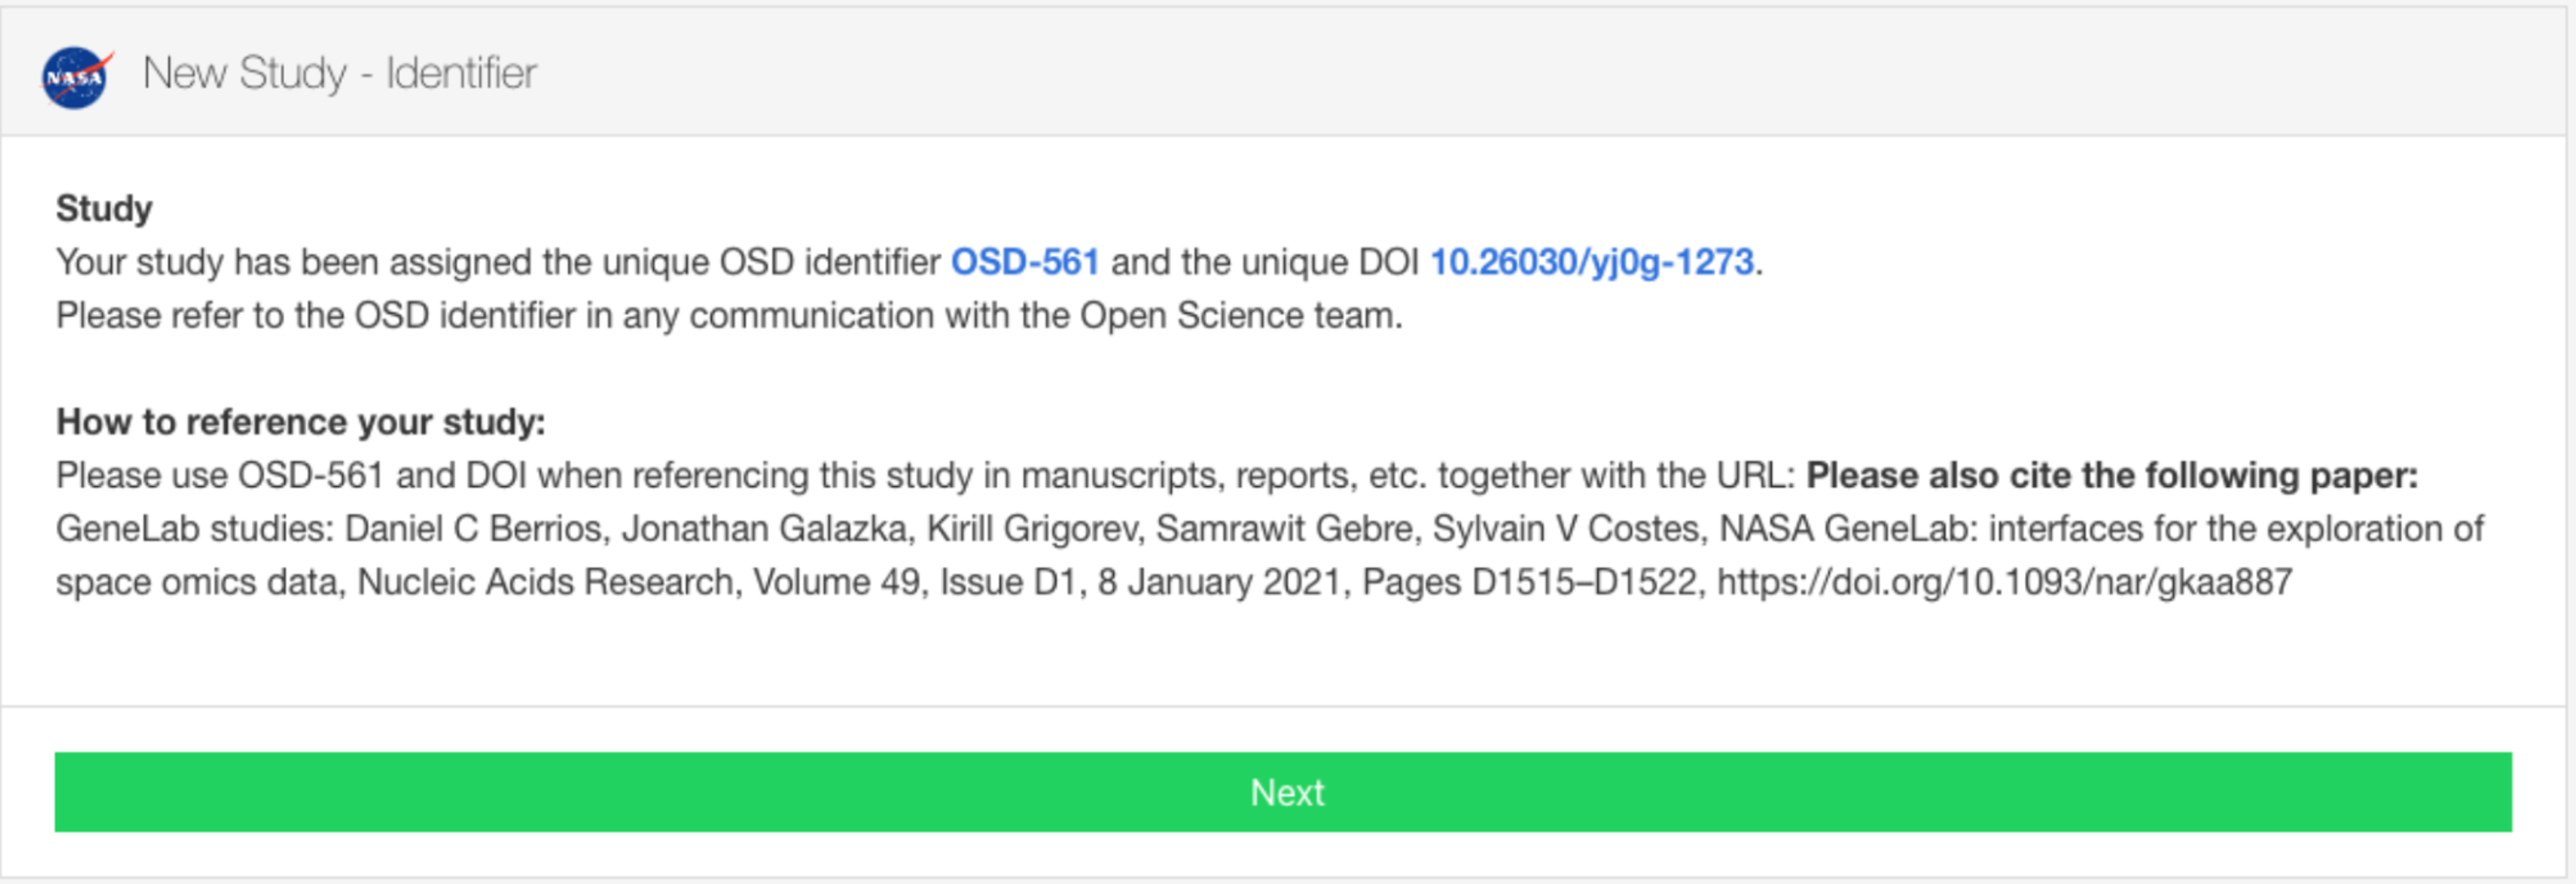
Screenshot shows that the new study has been given a unique OSD ID and data set DOI which can be used during future paper publication process.
7. You are now ready to enter metadata and upload data files: OSDR helps organise metadata into sample-level information and assay-level information. Data files are uploaded into the workspace and can be associated with each study based on metadata.
There are 3 ways to proceed from here.
Option 1: Manuscript-guided auto-populate metadata.
Option 2: Manually enter your metadata and upload files directly to BDME User Interface. Once completed, follow the instructions in the tutorial to submit your study to OSDR Curation for review.
Option 3: Use the templates below to enter your metadata and submit the completed sample-level and assay-level metadata files to OSDR Curation at arc-dl-osdr-data@mail.nasa.gov. Upload all data files to your workspace.
Below you will find a sample-level metadata template and assay-level metadata templates for the most common assay types. Use these to properly format your data prior to submission.
If you don’t see your experimental assay in the folder, please contact us so we can add it.
Entering the study description using publication (Option 1)
7.1. The page explains how to proceed with guided submission or skip to the study overview section when submitting a study.
Guided submission offers step-by-step guidance for new users or complex studies but requires a pre-published paper to guide the process. Users can also choose to skip guided submission and directly provide an overview of their study, including purpose, methods, and procedures. Regardless of the chosen path, both options lead to the final step (step 8) where users can review and make necessary changes before submission to the OSDR. Additionally, users can stop at any point and resume editing later, ensuring flexibility throughout the submission process.
In this example we can see the user has got the study description stage, they now have the choice to add their Study design description manually or provide a DOI or PubMed ID to automate the metadata field completion.
.png)
Screenshot showing the study description creation page, at this stage the user can decide to import study description from a DOI or PubMed ID or can choose to enter the information and metadata manually.
Guided Submission (Option 1)
7.2. There is a lot of information required to populate all the fields, but if you’ve already published a peer review paper then the guided submission process can help.
Enter the following information, this can be done at a time that is convenient and by clicking on the “Next” button you can navigate through the process so you can familiarize yourself with each stage.
Study Design Description: use an ontology if available.
Study Title: Use the primary paper title or a related phrase.
Study Summary: a brief description of the study. You can also enter the abstract of the publication, there is a 60-character minimum for this field.
Study Contact: the principal investigator and the submitter are required to be listed in a dataset.
Manuscript: enter DOI or PMID to add a manuscript (s).
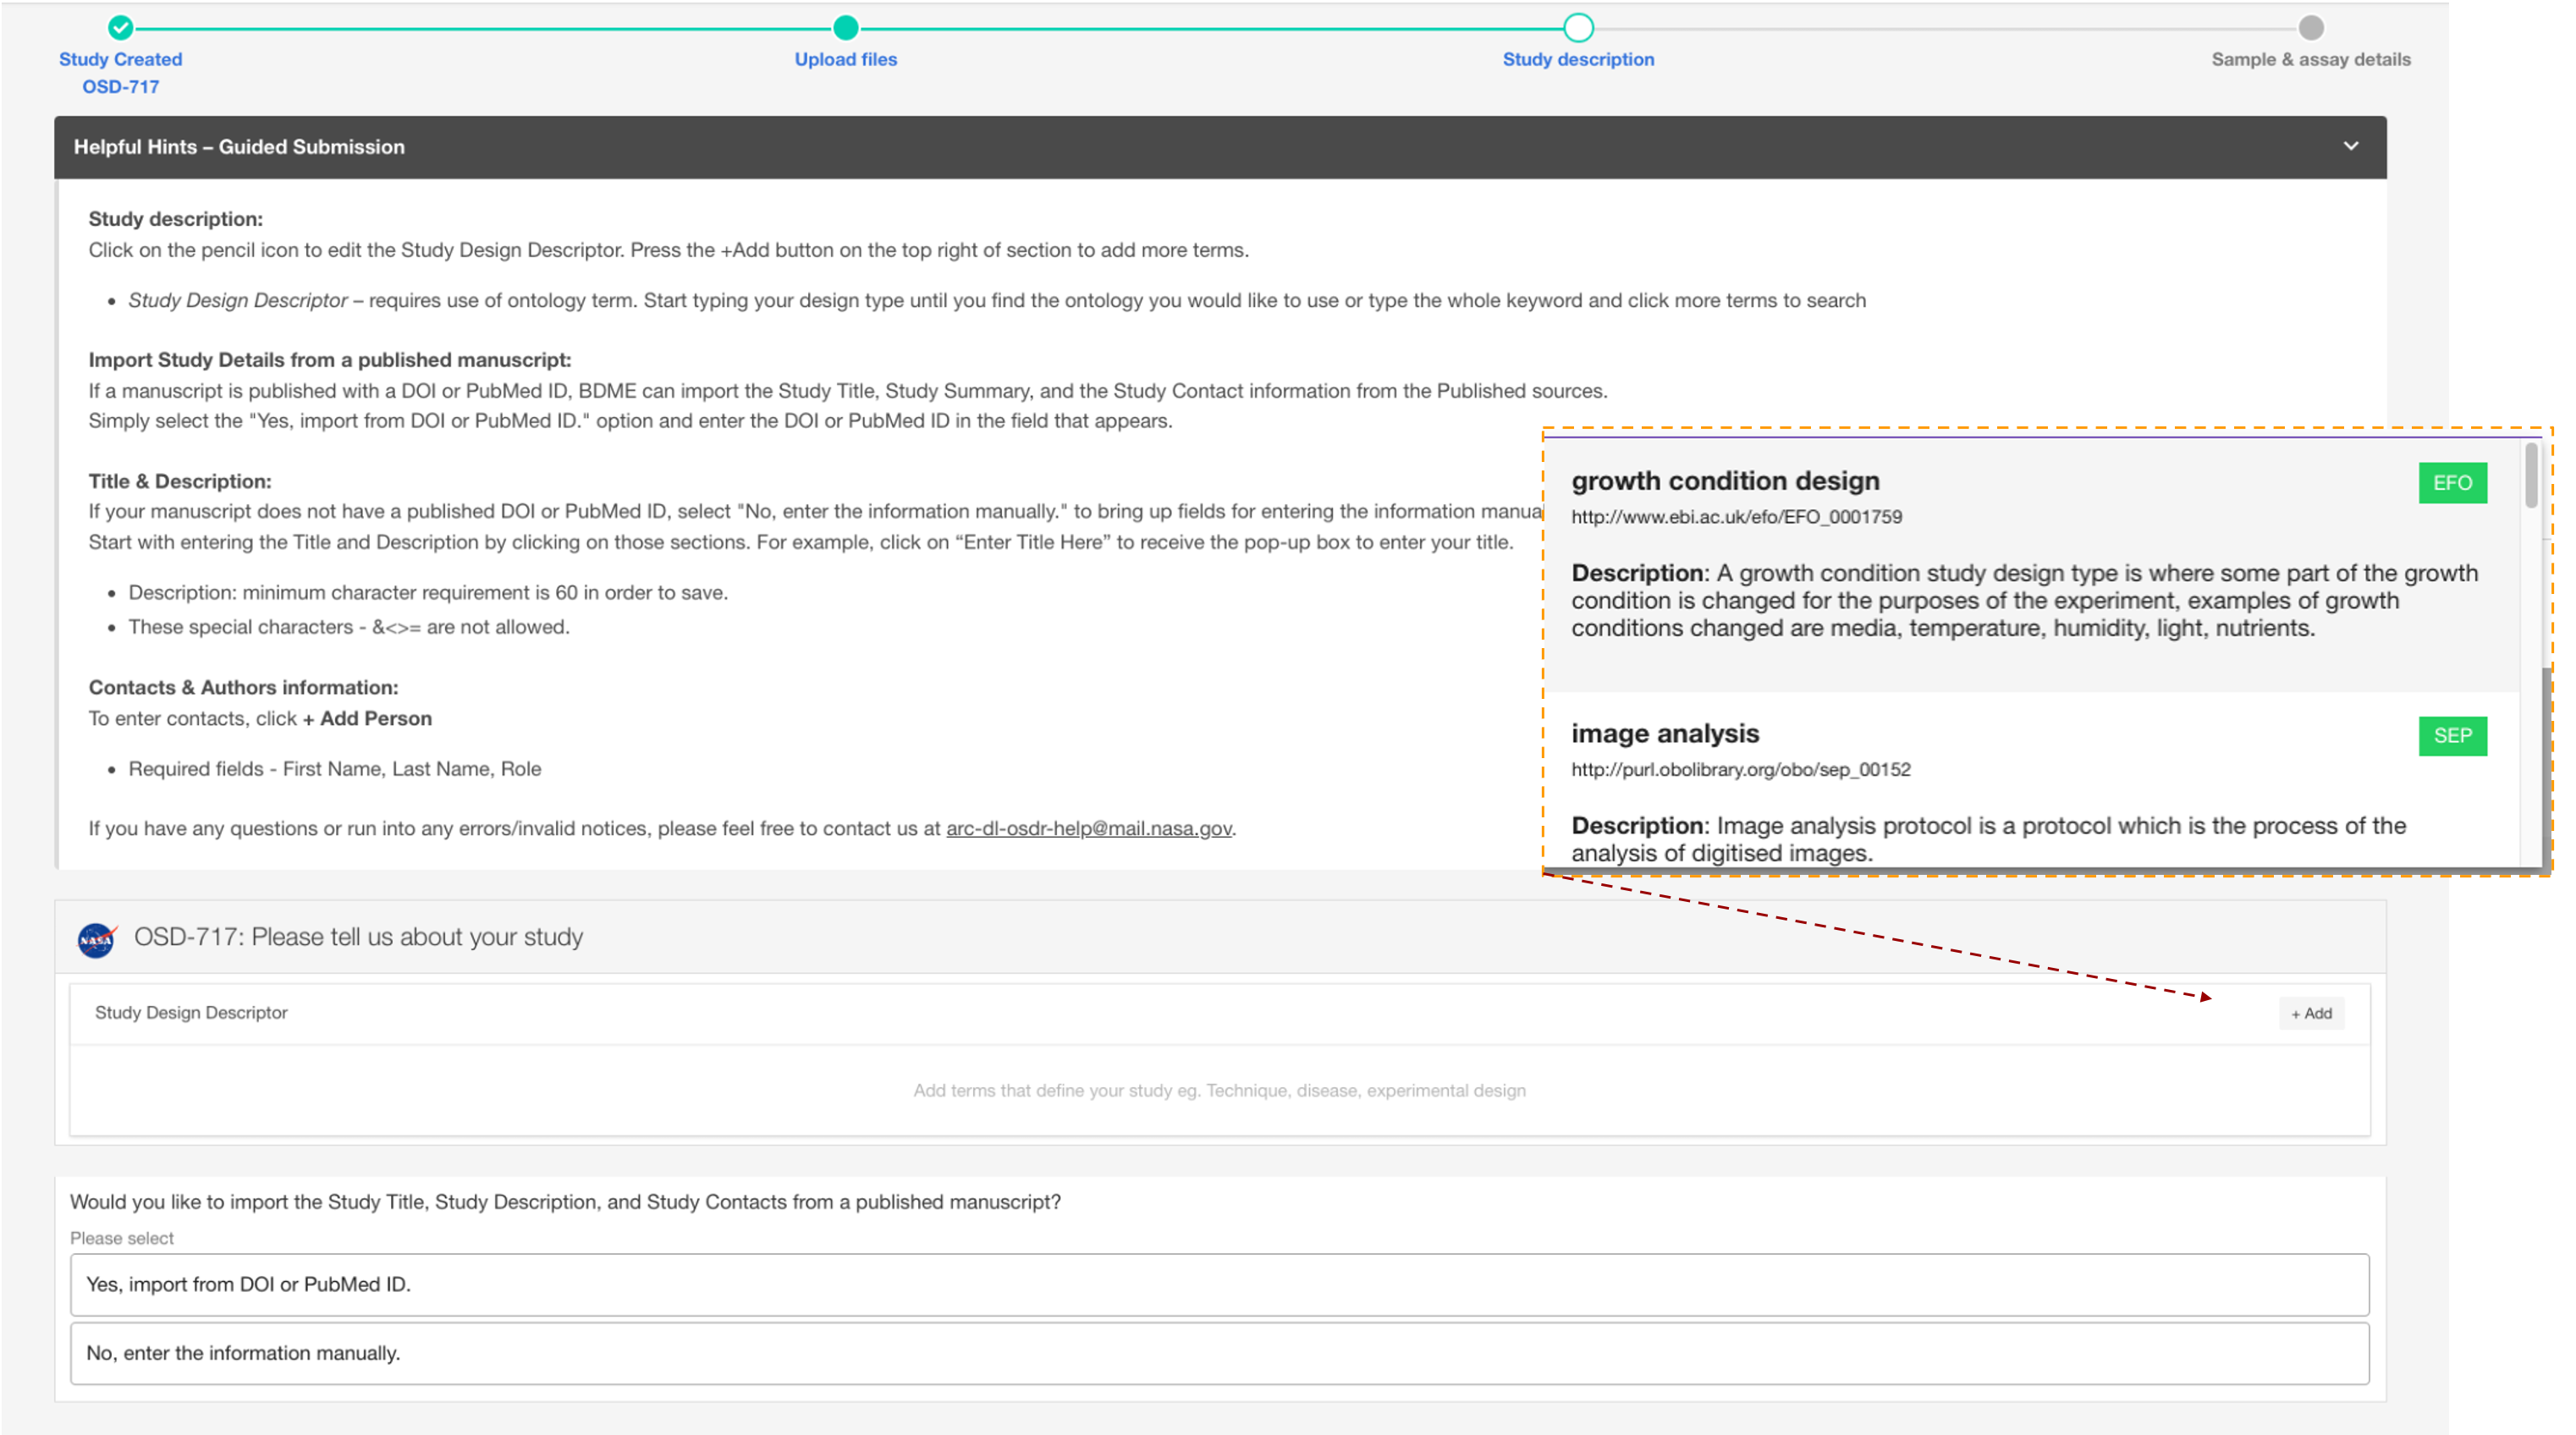
Screenshot shows the study description creation page with a red line highlighting how the user can choose to enter the Study Design Description information and metadata manually. The diagram has been highlighted to show how the ontology database assists with field completion. A red dashed line points at the “+Add” button that allows users to add study descriptions.
Guided Submission adding assays (Option 2)
7.3 Click and add study design information related to your study.
You’ll be able to select the Measurement, Technology type and Platform applicable to your data.
Click “Next” to go to the next step and populate assay info later.
In this example the assay type measurement type was transcriptional profiling, the technology type is still to be selected in the drop-down menu.
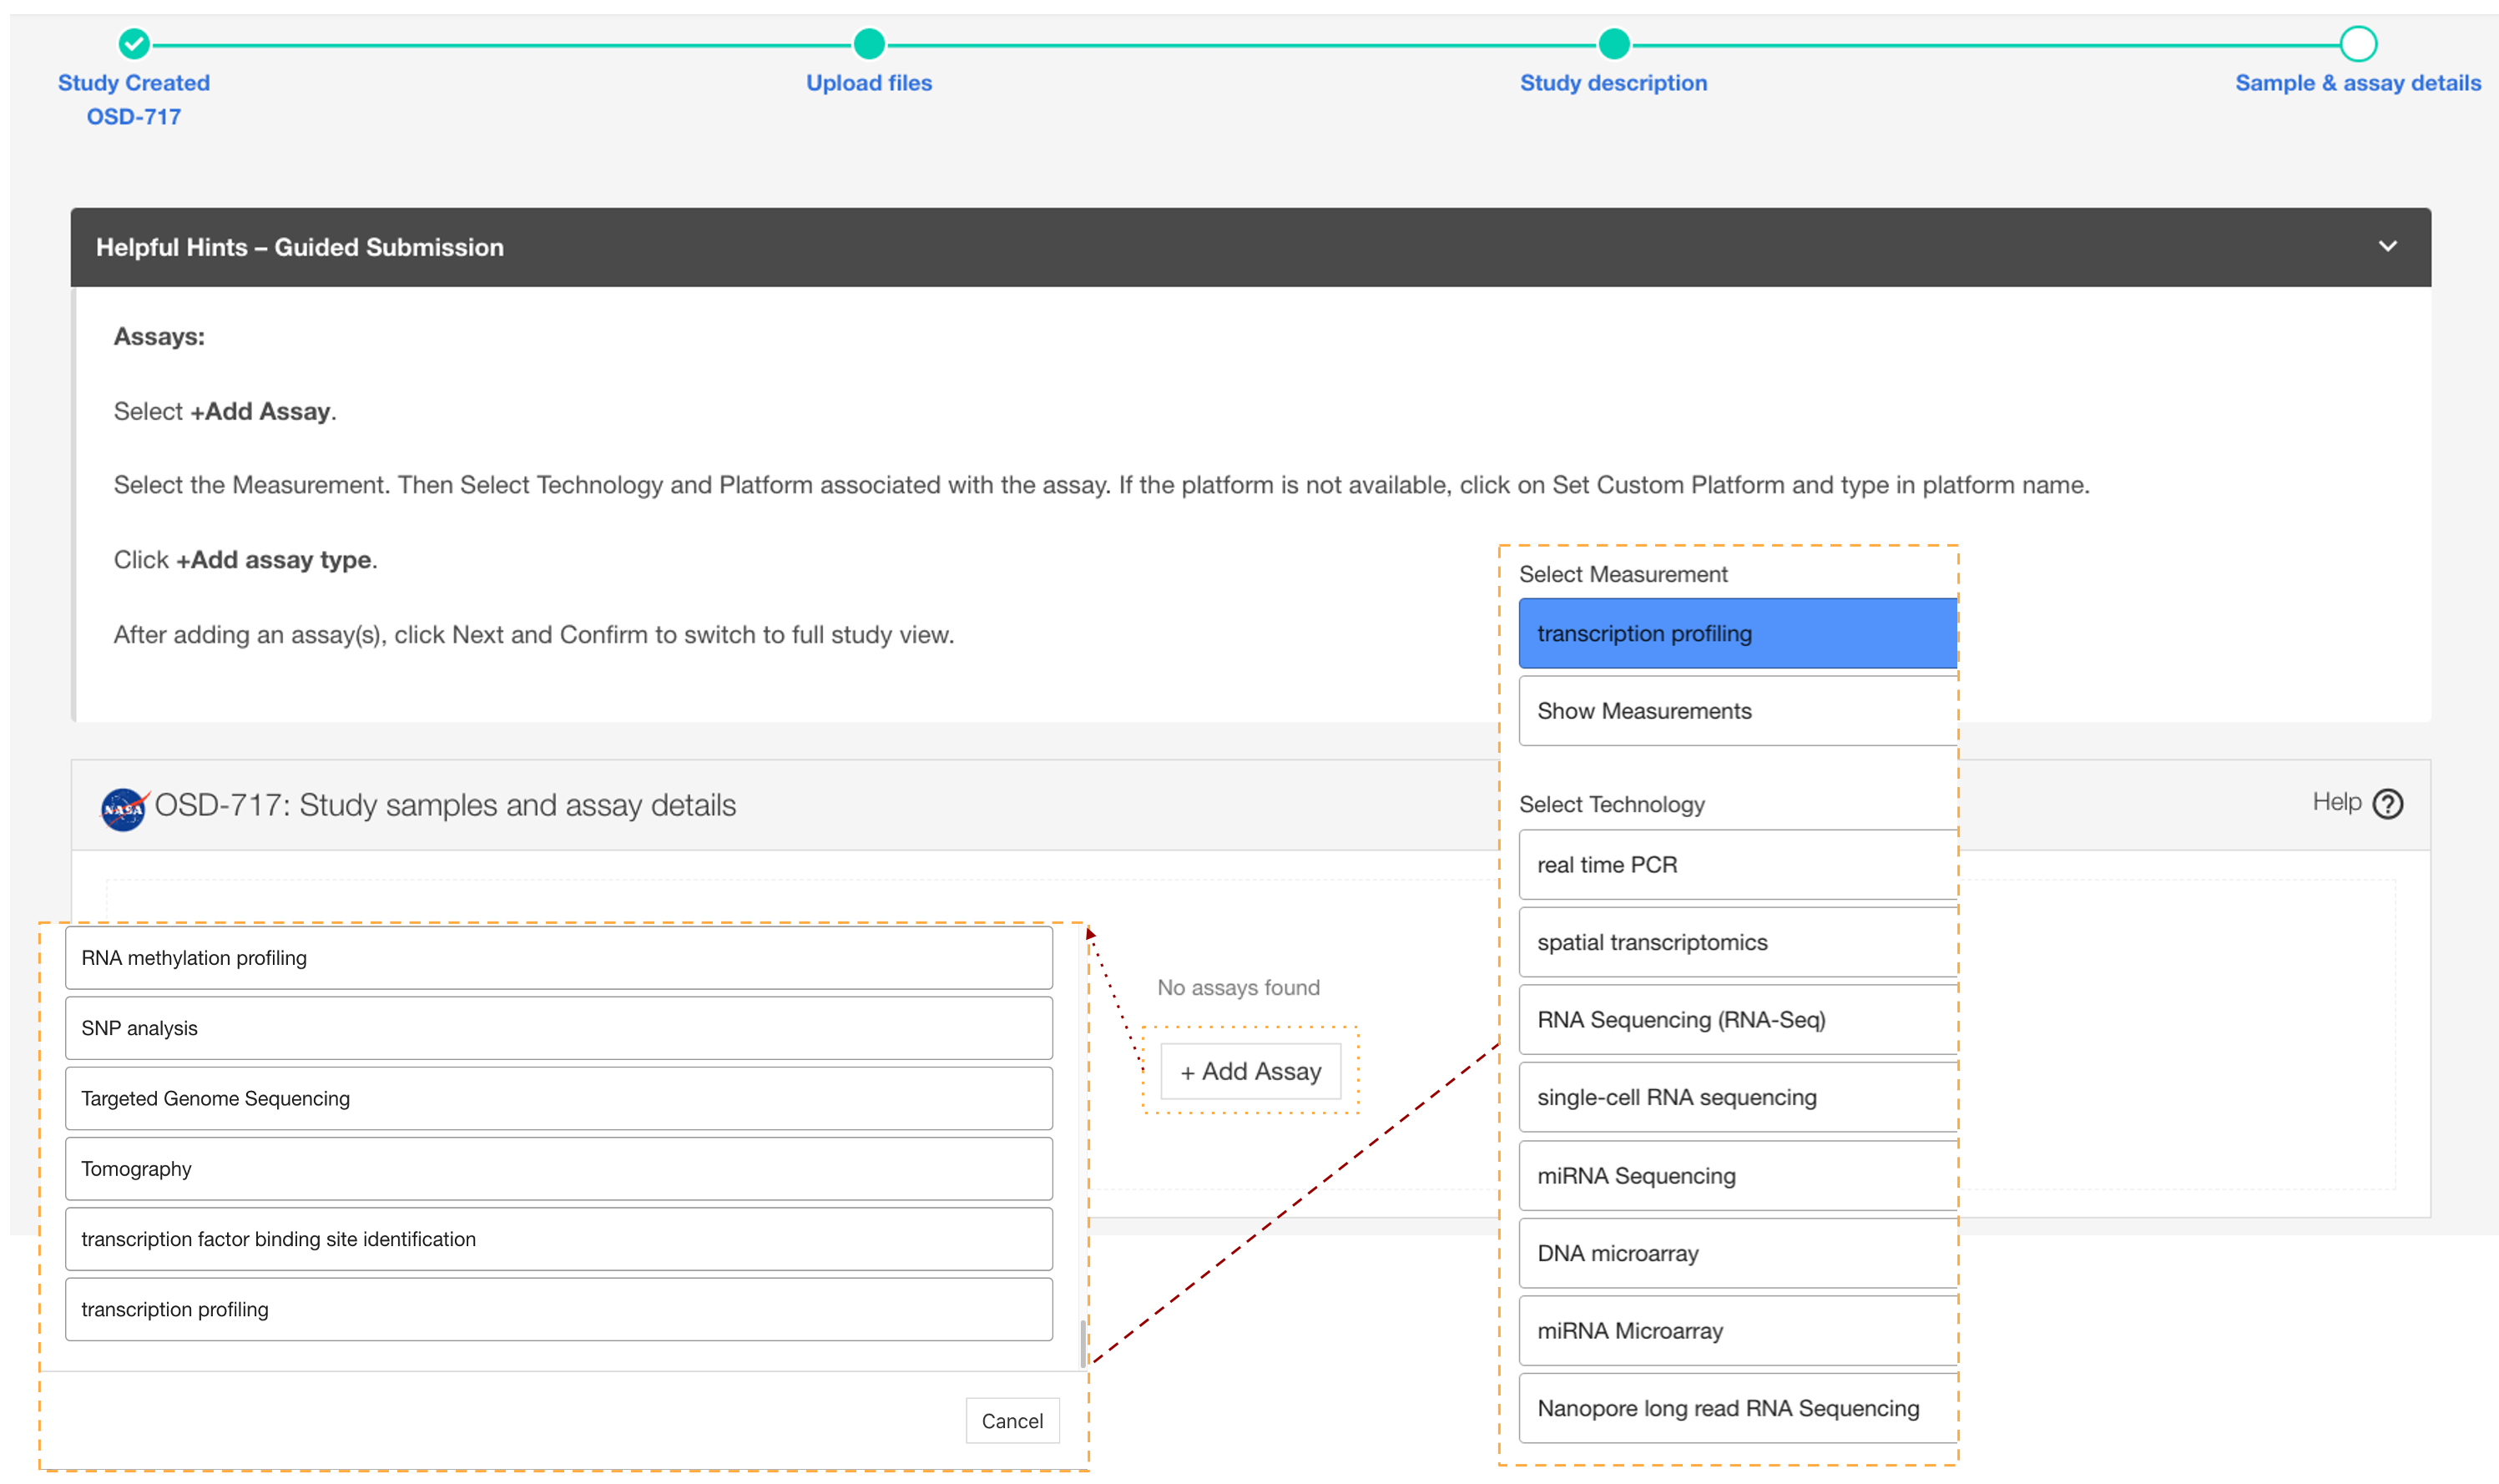
Screenshot showing that the guided submission process allows you to add metadata related to your assay type. The red dotted line shows the first set of ontology-defined options the user is presented with, the yellow dashed boxes highlight how a highly curated “nested” ontology database can be used to assist your definition of assay type.
Unguided Submission (Option 3)
8. ´Enter your study title, and description and click to list people who participated in the study if you have not done so in the previous steps.
The principal investigator and the submitter are required to be listed in a dataset along with other members of the primary research team. Other metadata concepts such as project type, flight program, or NASA center can all be added. “Funding source(s)”, “Experimental platforms”, “Sponsoring agency” and “Acknowledgements” are all free text fields allowing the data submitters to provide links to previous project ID’s and data management plans.
In this example, 3 highlighted pop-out boxes show some of the options in the Project Types, Flight Program and NASA center are linked via red arrows to the pop-up windows that provide the user with a list of options to select from.
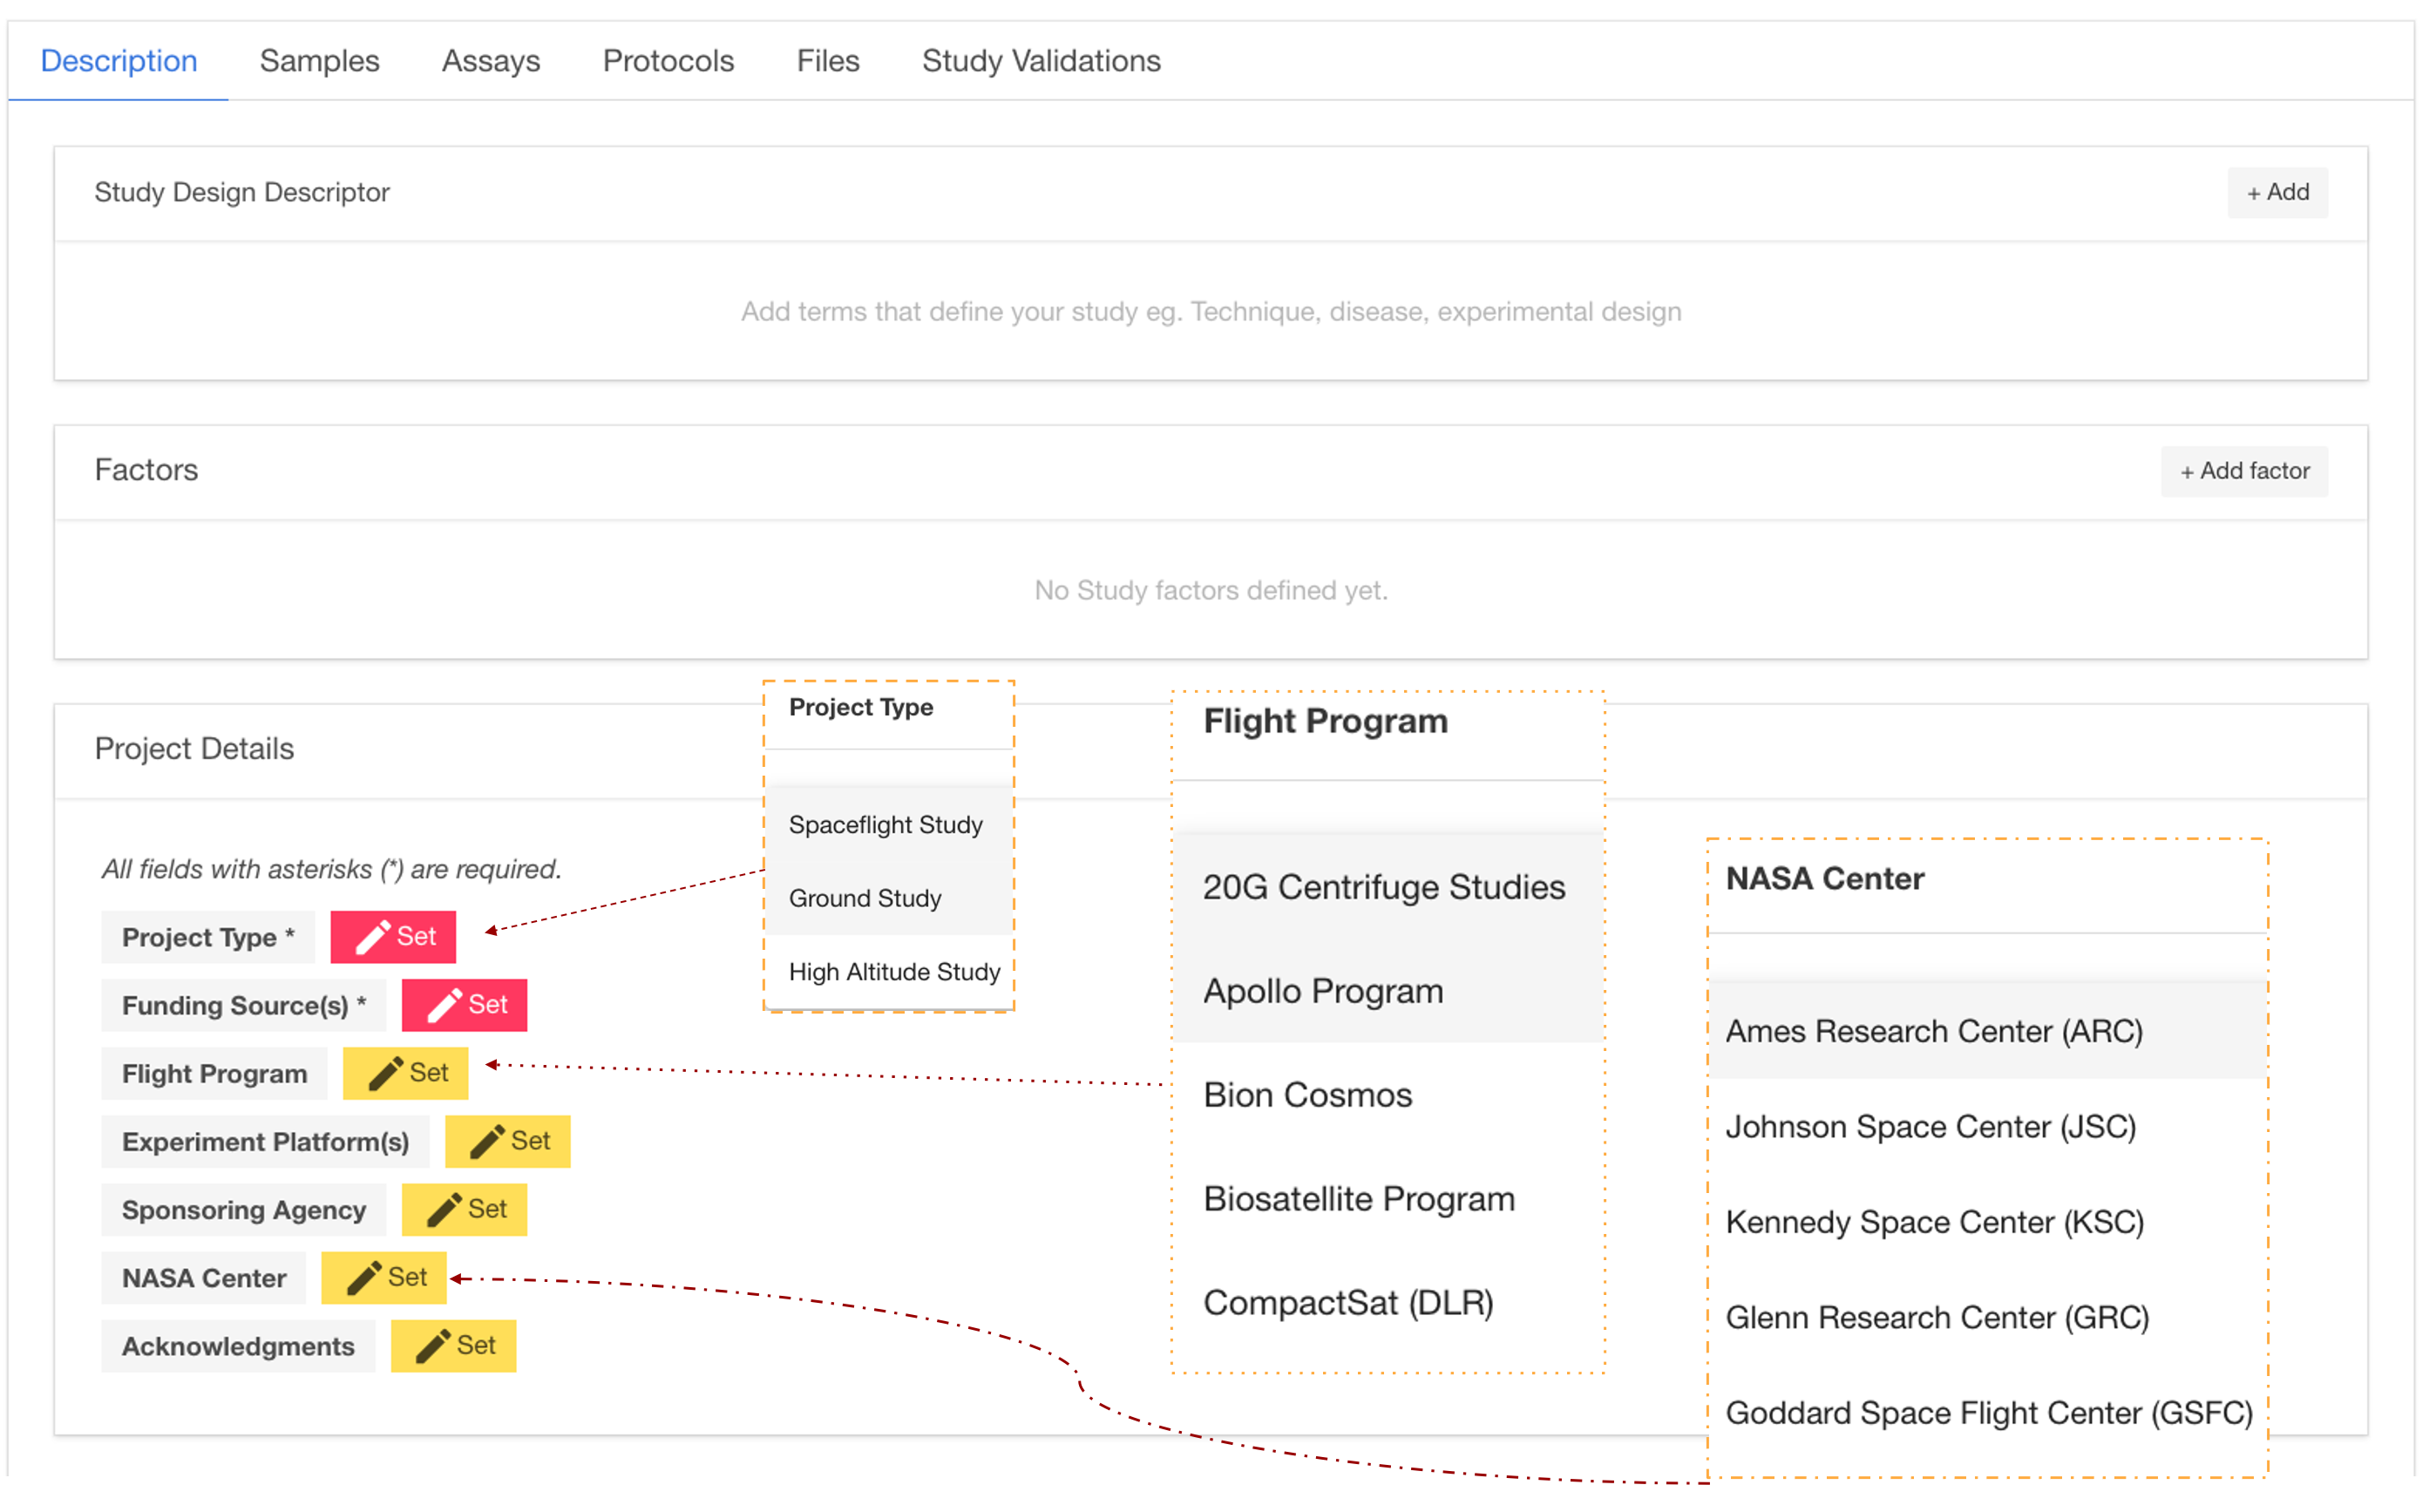
Screenshot showing the user interface that allows users to input metadata related to their study. 3 highlighted pop-out boxes show some of the options in the Project Types, Flight Program and NASA center. Red lines and arrows highlight the assisted completion options that are available for uses, the other key project details can be completed with text-based answers.
Study description
8.1. The study description needs the user to input text but provides guidelines for creating a detailed study design descriptor.
The description is intended to provide comprehensive information about the study to facilitate understanding and reproducibility. It includes sections on study design, factors studied, project details (funding, institutions, and principal investigators), mission description (for spaceflight studies), data source, and data submission information.
In this example, the user has selected to add publication as it contains the information required to populate the study description and is in the process of entering data into the publication metadata fields.
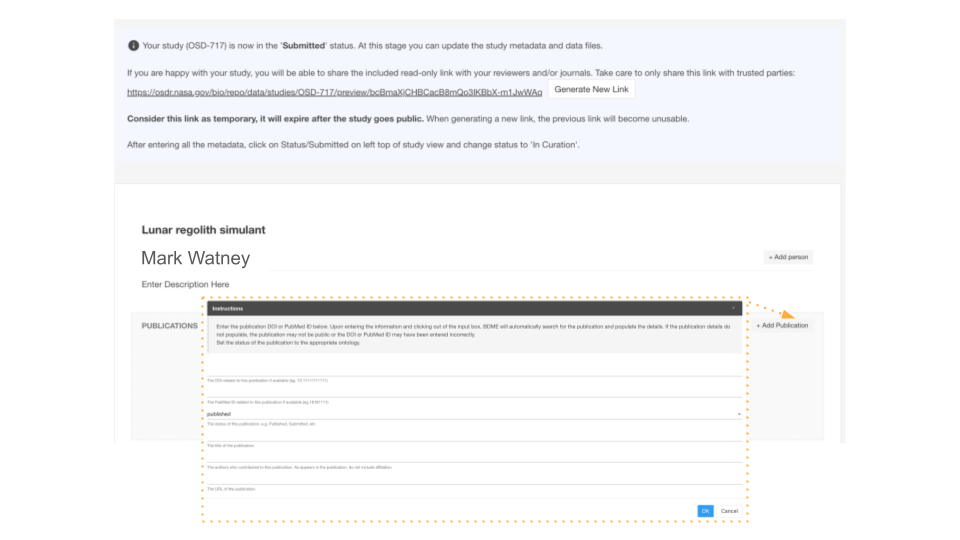
To effectively collaborate and document your experiment, you can add co-investigators and provide thorough descriptions through the user interface. Begin by utilizing the Add person option to include co-investigators, detailing their names and roles. Subsequently, input a comprehensive experiment description covering its background, methods, and expected outcomes. Additionally, enrich the context of your work by incorporating related publications via the +Add publications button, adhering to the provided instructions for formatting and submission. This process enhances both the collaboration and the documentation aspects of your research.
Protocols
8.2. You will need to describe the protocols you used to generate samples for analysis with your assay(s) of choice.
If you have added an assay in the previous steps, you will find a list of default protocol sections for the assay chosen to be populated. If you haven’t added an assay, you can first go to the “Assays tab” and add an assay then return to the “Protocols tab” to populate all the protocols. Adding a protocol parameter to a sample this way allows the user to use the preexisting ontology database making it easier to connect with other studies in the Open Science Archive.
In this instance, the “add parameters” button has been emphasized, and a pop-up window reveals the existence of a nested ontology database intended to guide in the addition of recognized factors. Moreover, it facilitates the user’s input of a parameter value that is not present in the ontology as free text.
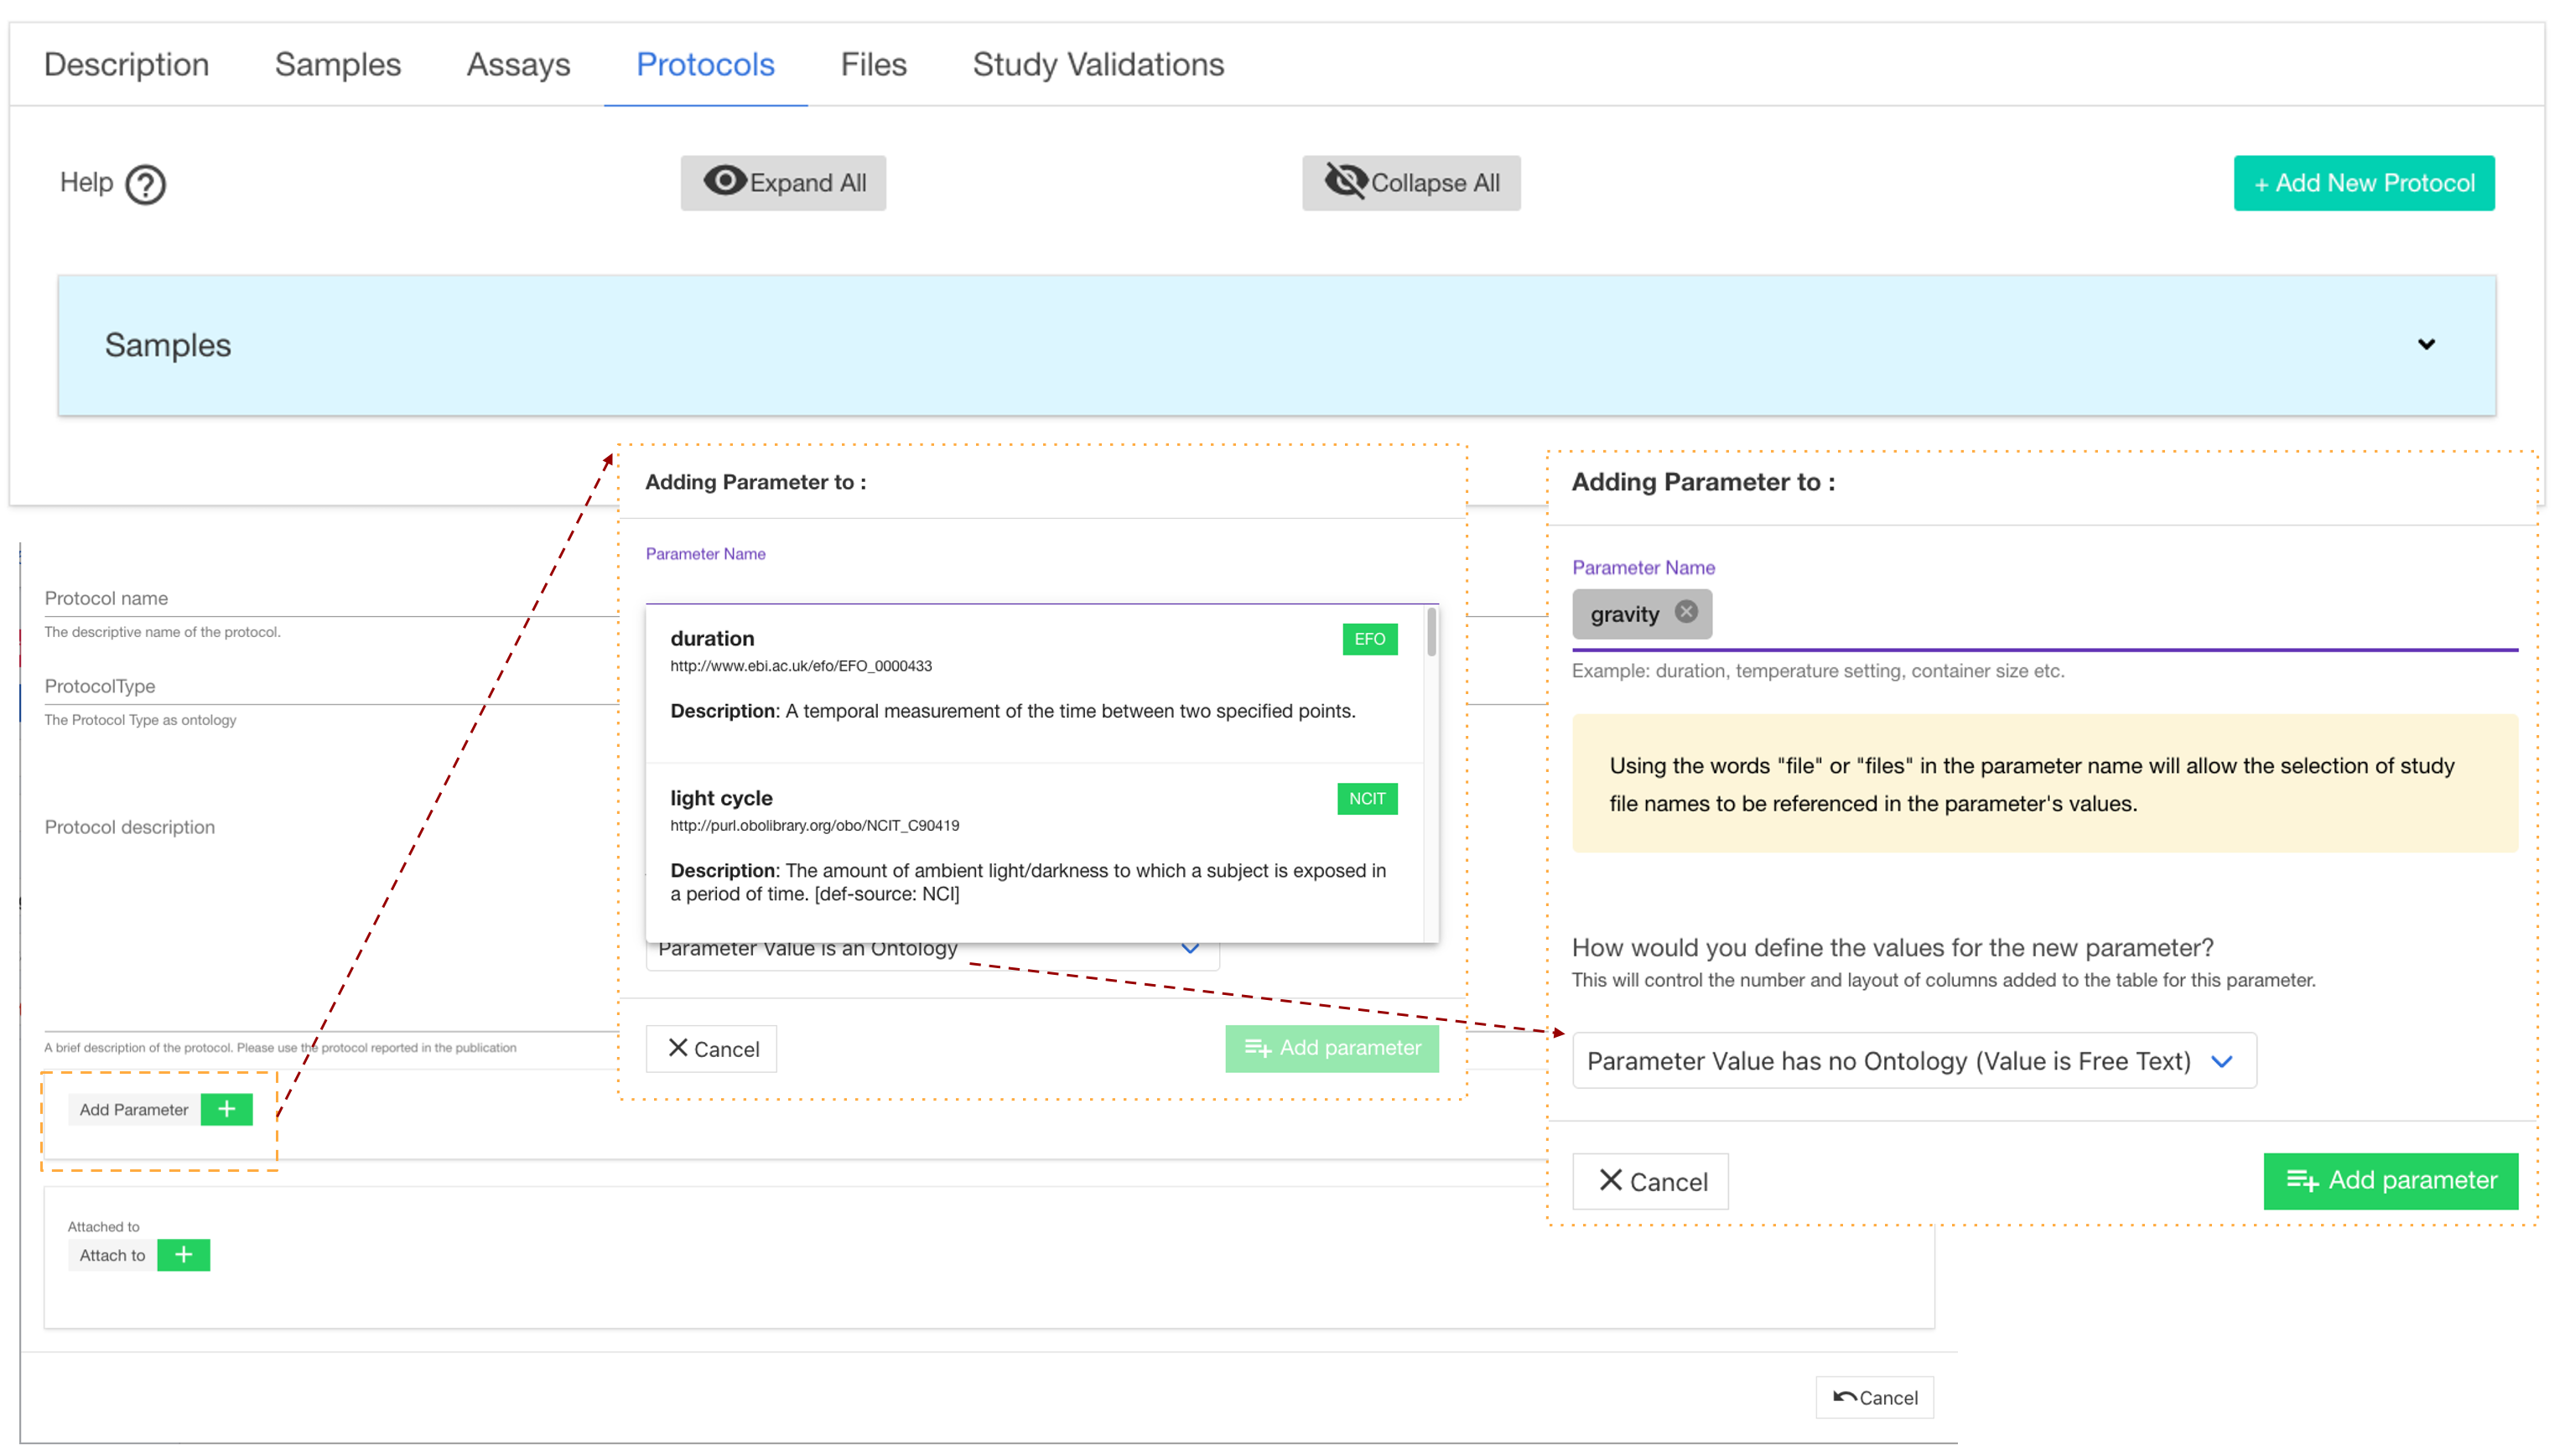
Screenshot showing the user interface that allows users to add information about the protocols that were used. The add parameters button has been highlighted, the image shows that there is a ontology database to help guide the addition of known factors. It also allows the user to enter a parameter value that no ontology as free text.
Samples
8.3. You will need to provide descriptions of your samples and the metadata that was collected during your study.
To provide detailed information about samples up to the point of collection, create one row per sample and select an applicable ontology term, if available. To initiate this process, select the sample’s characteristic column and add pertinent metadata such as organism, tissue type, age at harvest, preservation method or other relevant options.
The screenshot below illustrates how users can add characteristics to their sample metadata sheet.
Currently, there are no samples loaded.
In this example the samples have been highlighted, it shows it currently doesn’t have any sample field associated.
In the second panel, we can see that the “Characteristic” tab has been selected to highlight some of the category options such as organism, organism part, and variant or allows you to provide free text.
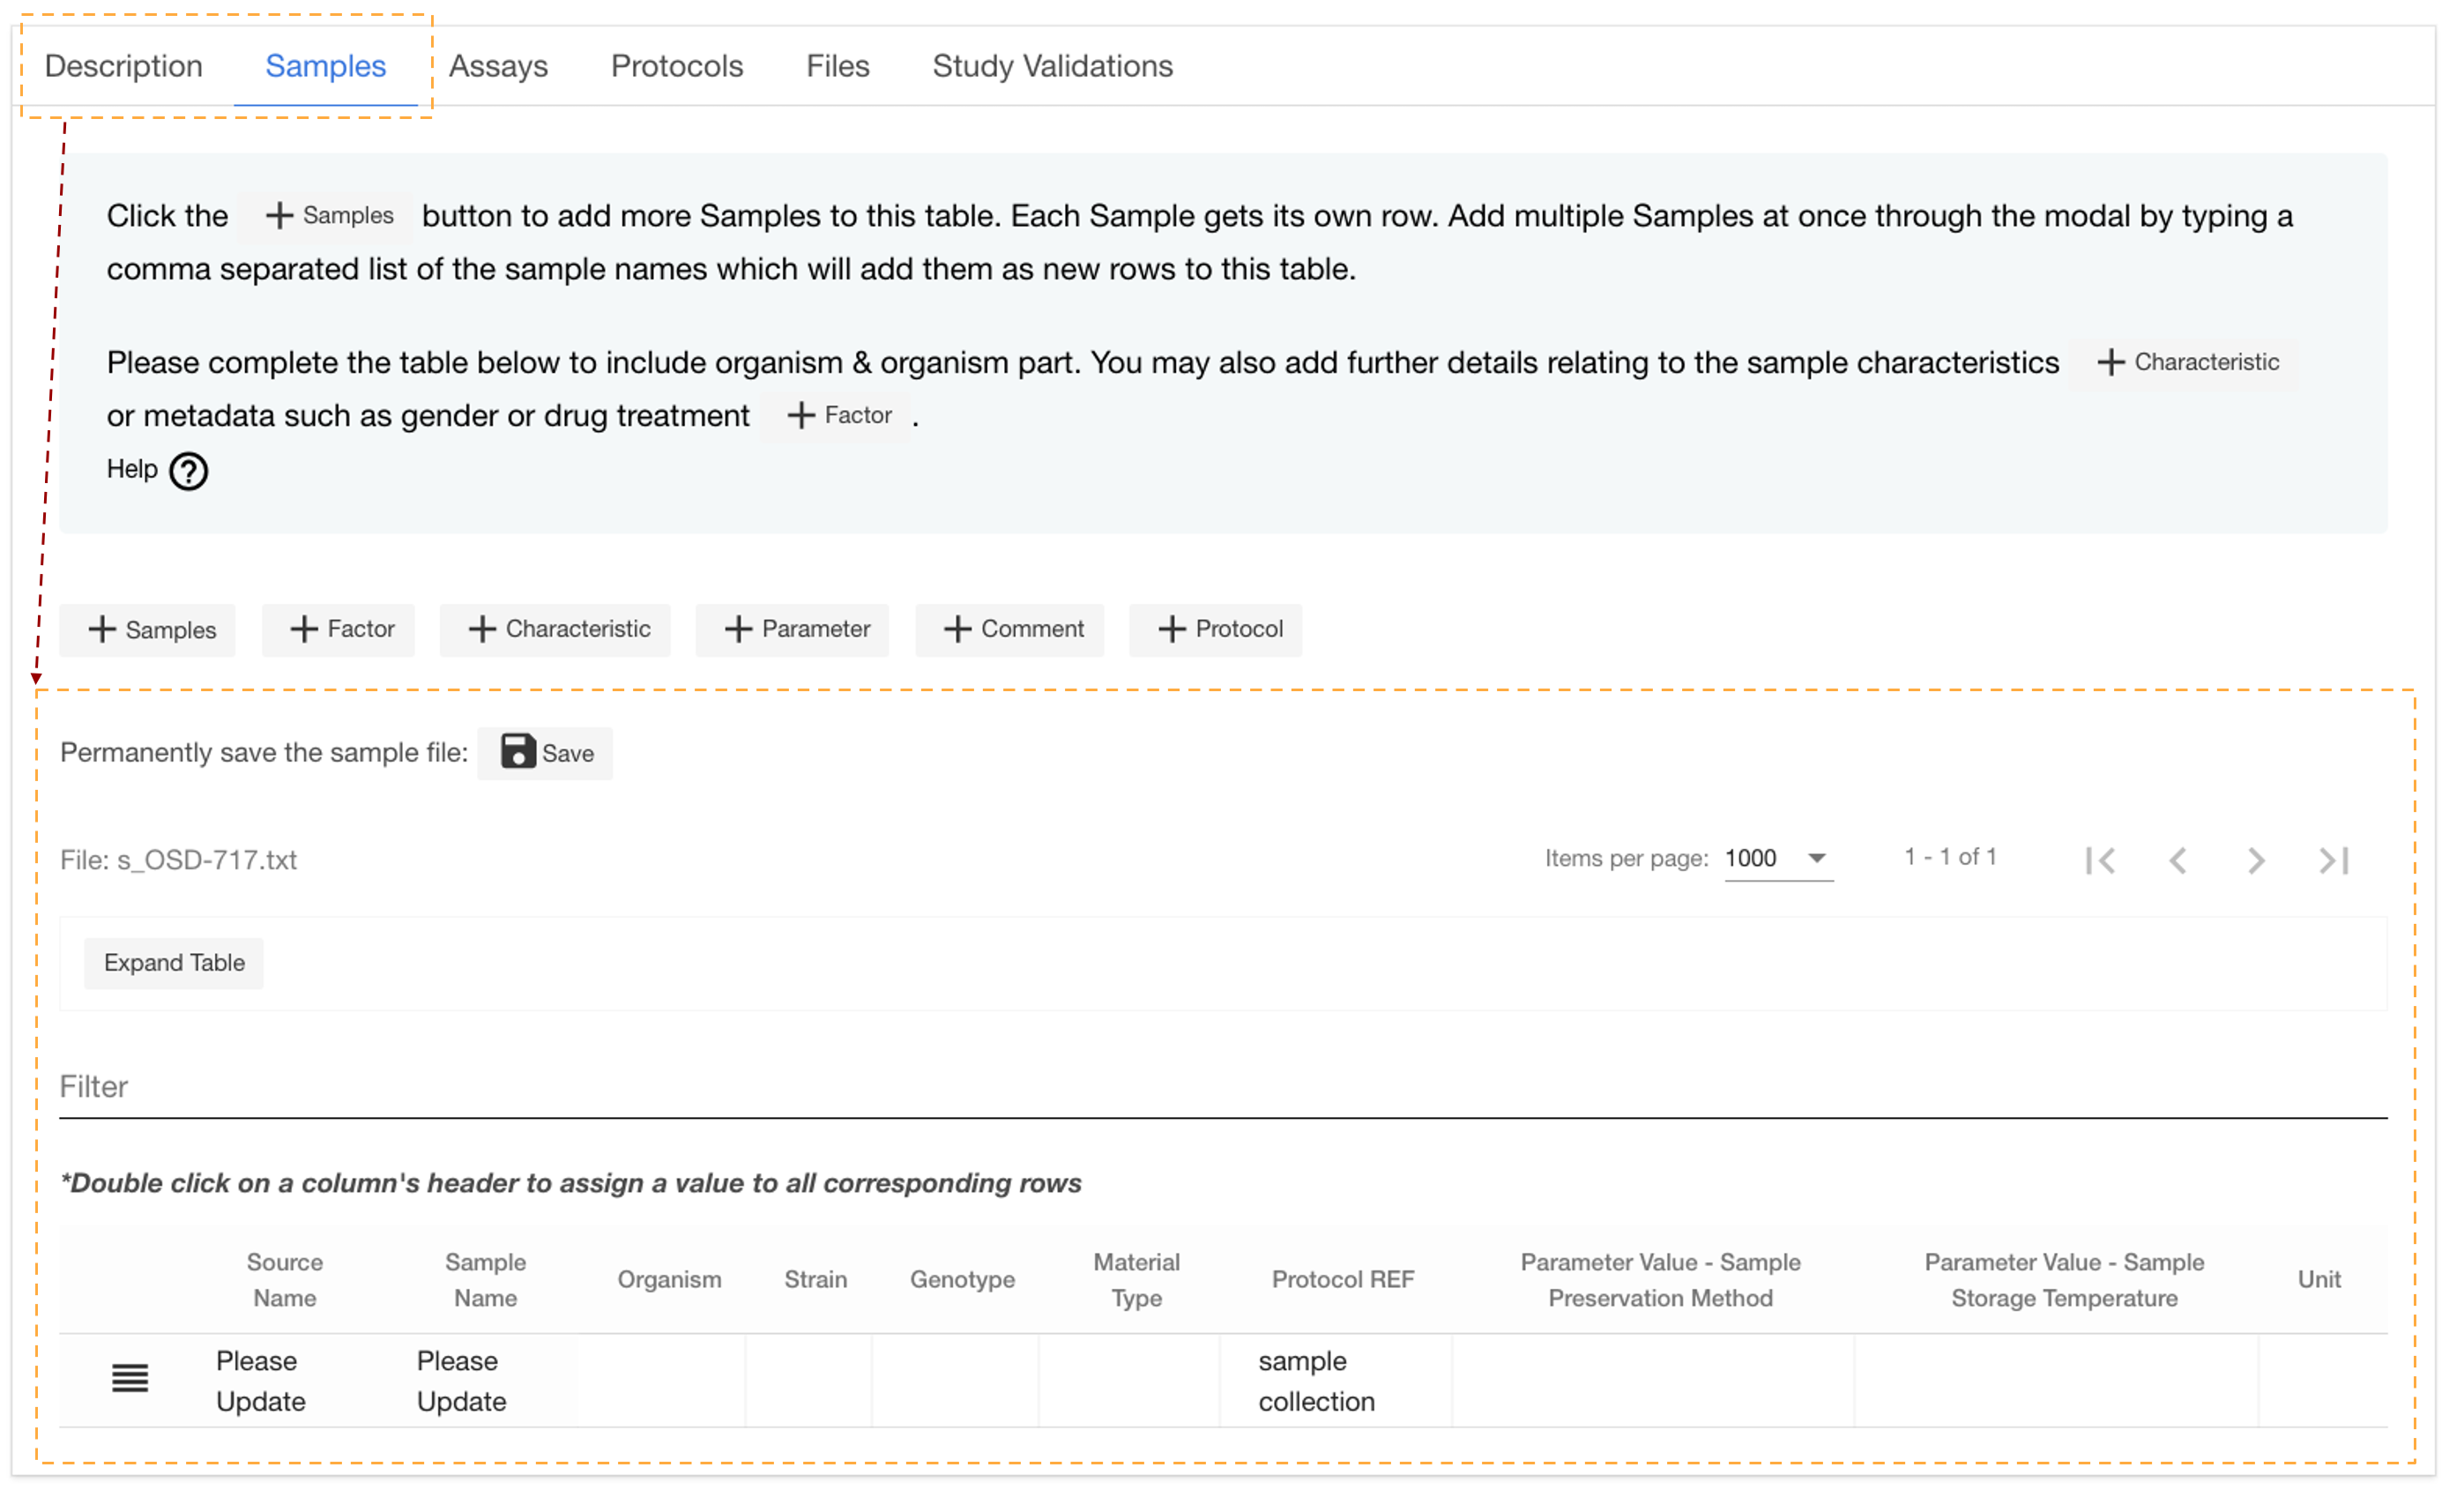
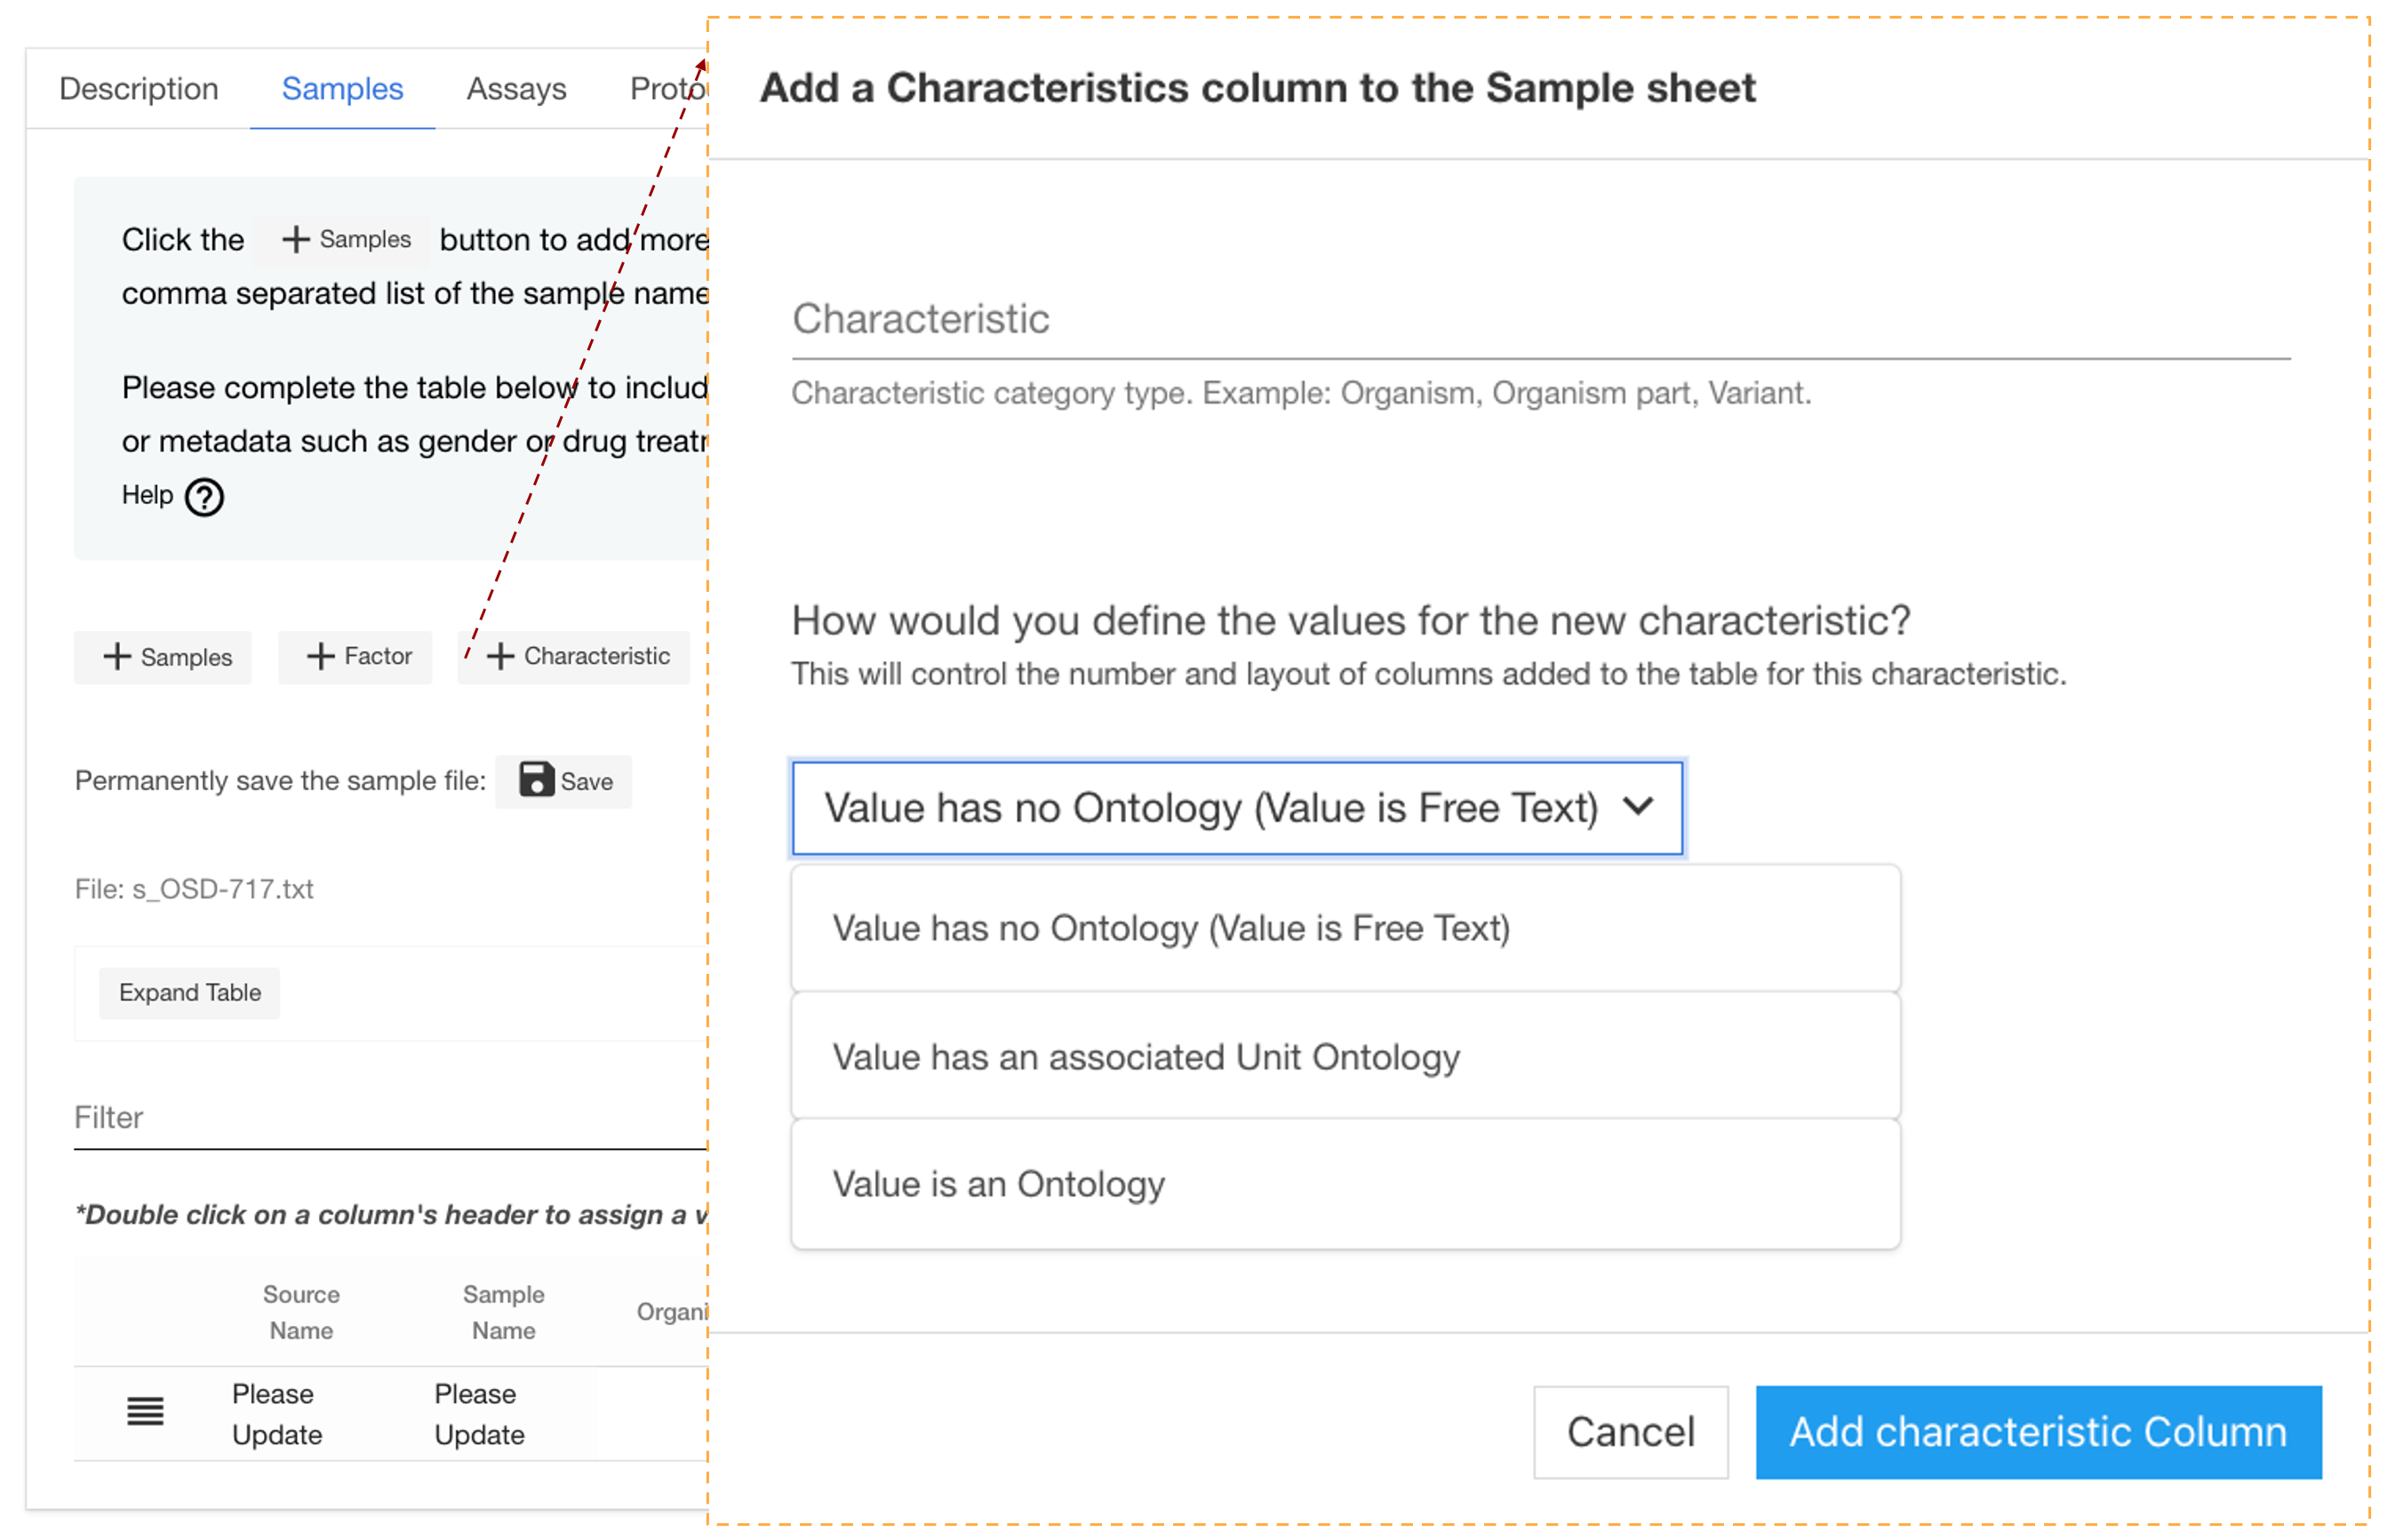
Screenshot showing the user interface that allows users to add information about the samples that were used. The add characteristics button has been highlighted, the image shows that there is an ontology database to help guide the addition of known factors. It also allows the user to enter a parameter value that no ontology as free text.
Assays
8.4 You will need to provide descriptions of the assays you used to assess your samples.
To populate assay level information, beginning with extraction, with one row per sample and select an ontology term if relevant. After the table, identify the sample-to-file relationship. In this illustration, clicking on the “add assay” button opens a pop-out window, allowing the user to choose a measurement type, which then provides a secondary option for selecting the technology type and even the precise platform.
For example, area measurements derived from image analysis using photography enabled by the camera platform, which is as specific as possible, in this instance, “Cannon EOS rebel”.
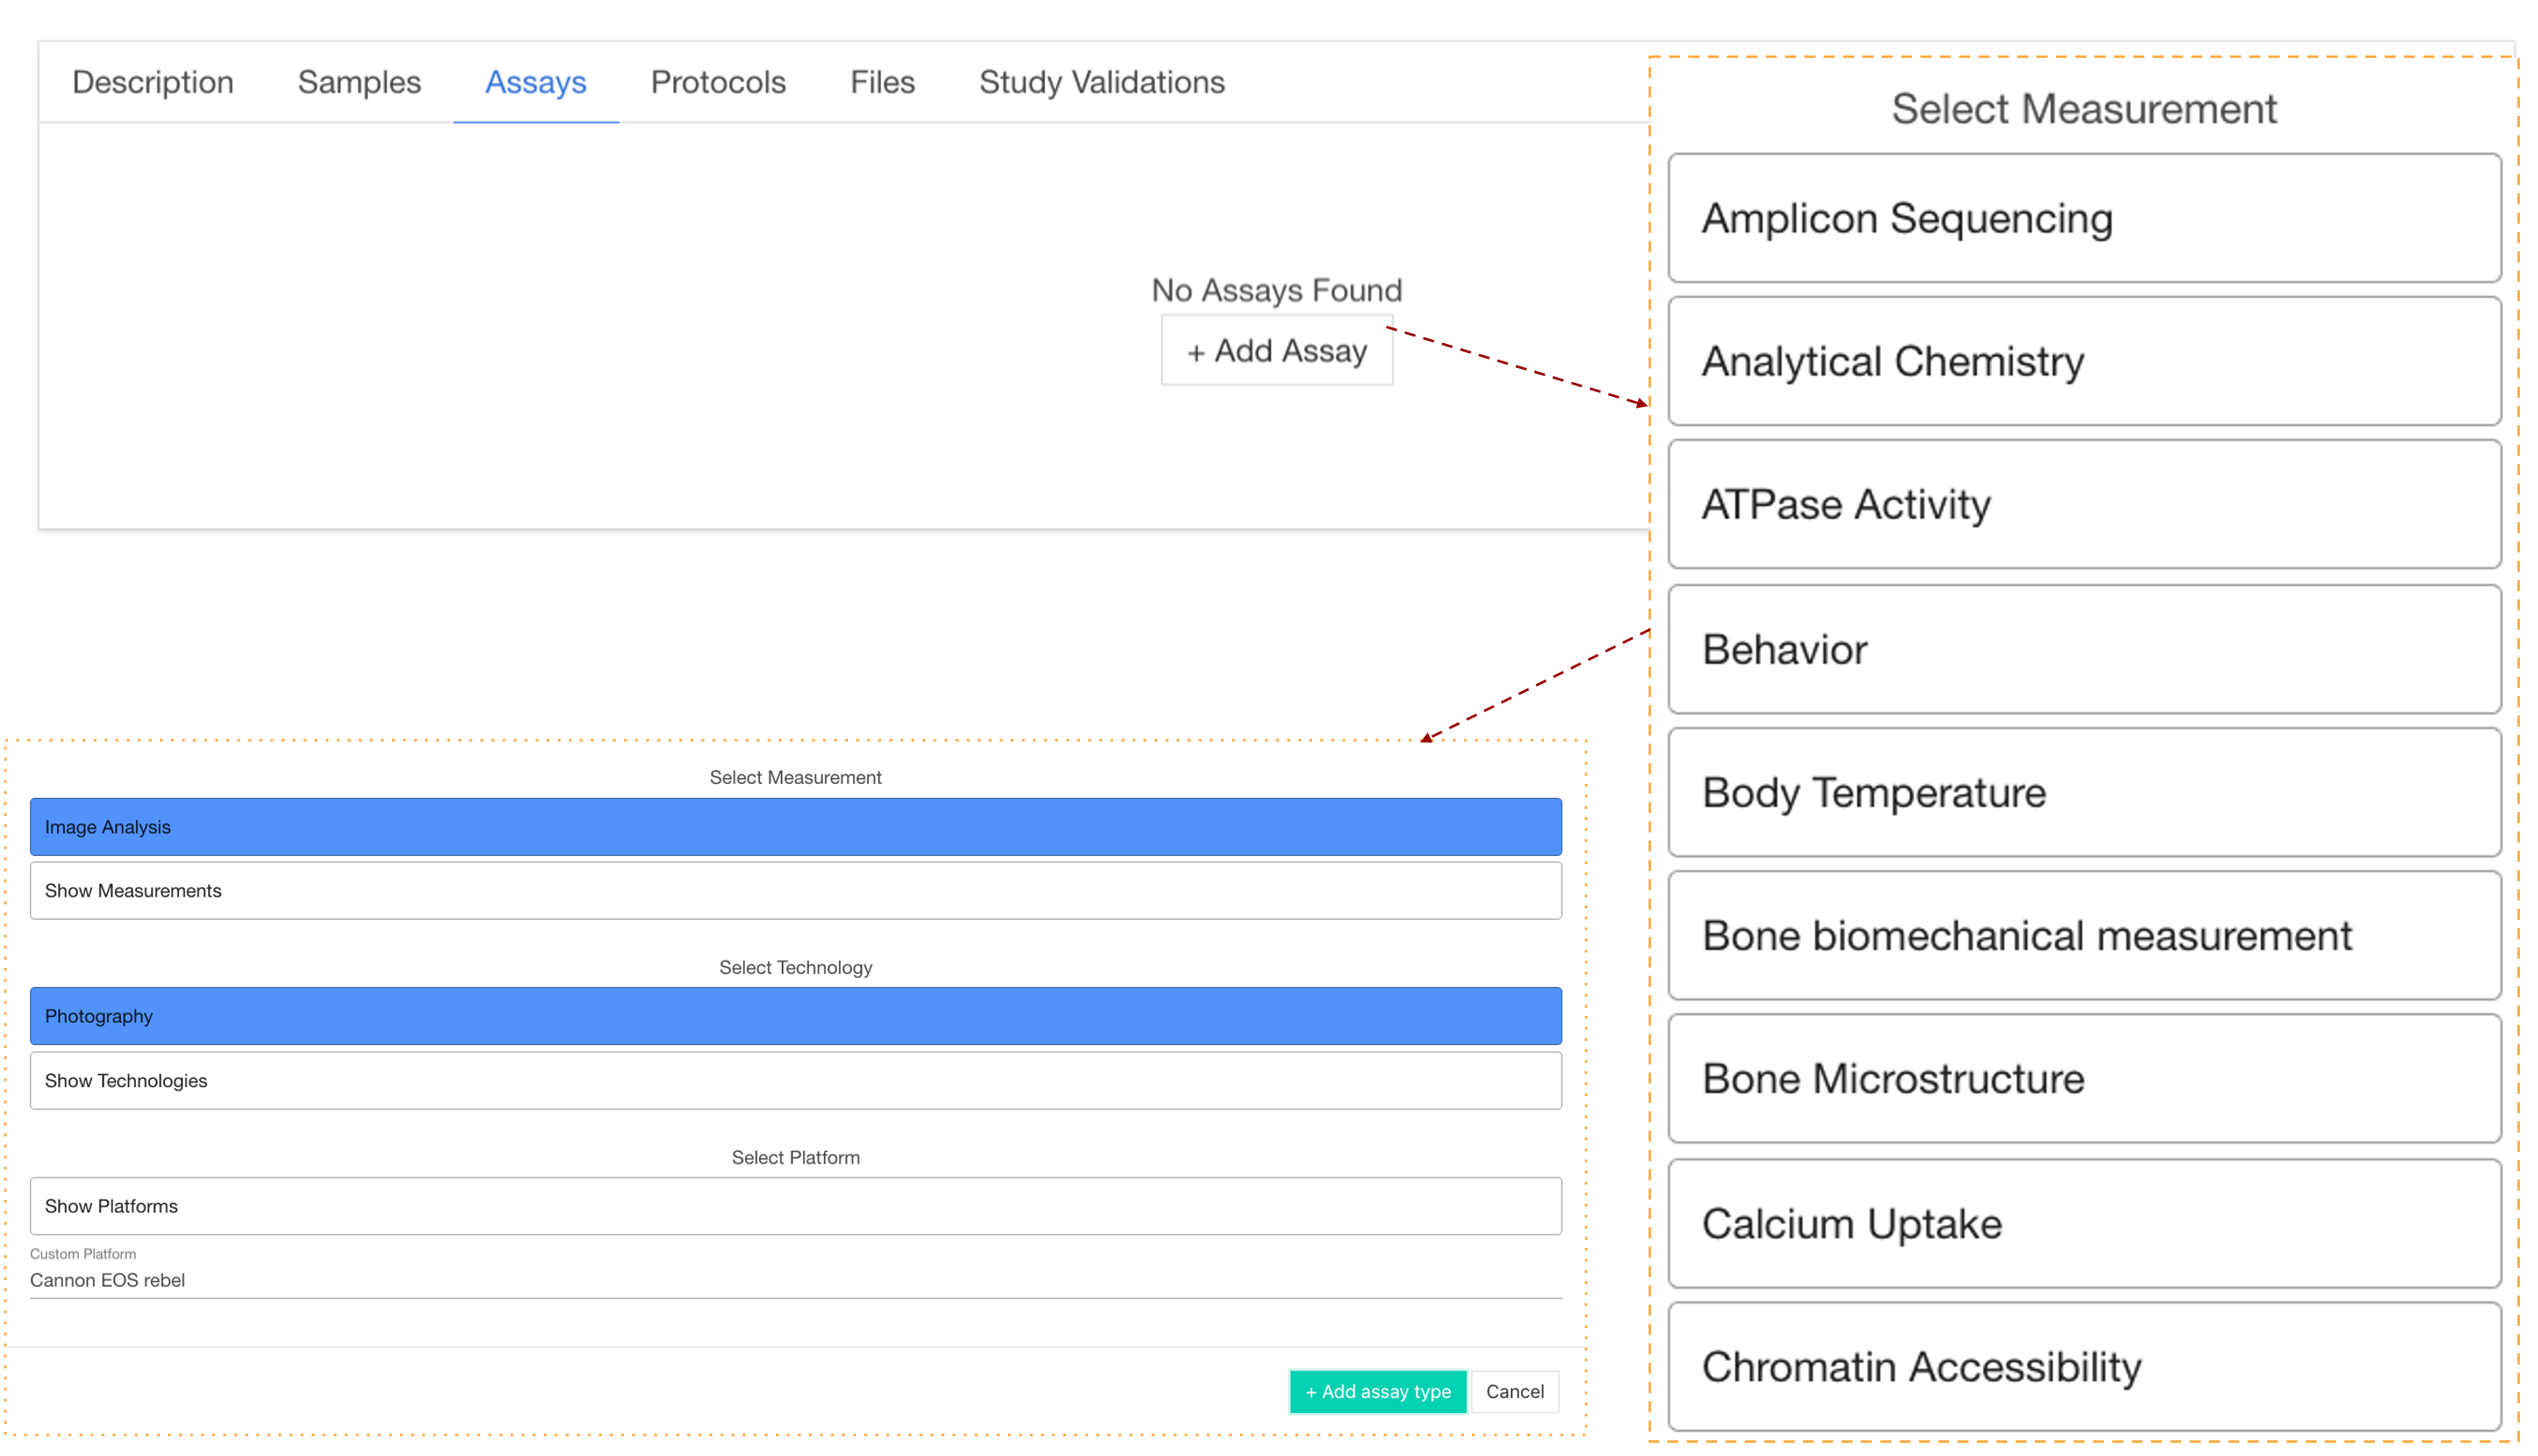
Screenshot showing the user interface that allows users to add information about the Assay that was used to analyze the samples. The “add Assay” button has been highlighted, the image shows that there is an ontology database to help guide the addition of known technologies and platforms. Red arrows show how a nested series of ontology databases assist the user in defining their experimental setup.
Files in the BDME
8.5 You can save your data files in your BDME account which is also connected to your Workspace account.
You can upload files by dragging and dropping them onto your “home folder” and then associate them with your studies in the OSDR at a later date after they have been uploaded (This time varies depending on your interest connection speed). Please provide compressed individual raw data files (e.g. .fastq.gz or .CEL.gz etc.) and do not archive multiple files as zipped archives. See this “Frequently Asked Questions” page, for accepted file types. After uploading files, click and open unfold the folder.
In this example, we can see that the user’s home folder contains their username “Mark Watney” and data folders nested inside that. This workspace contains the original raw data files and their processed results and some important intermediate file formats produced during the analysis. The yellow arrow highlights how users can drag and drop their data into their workspace from their desktop computer.
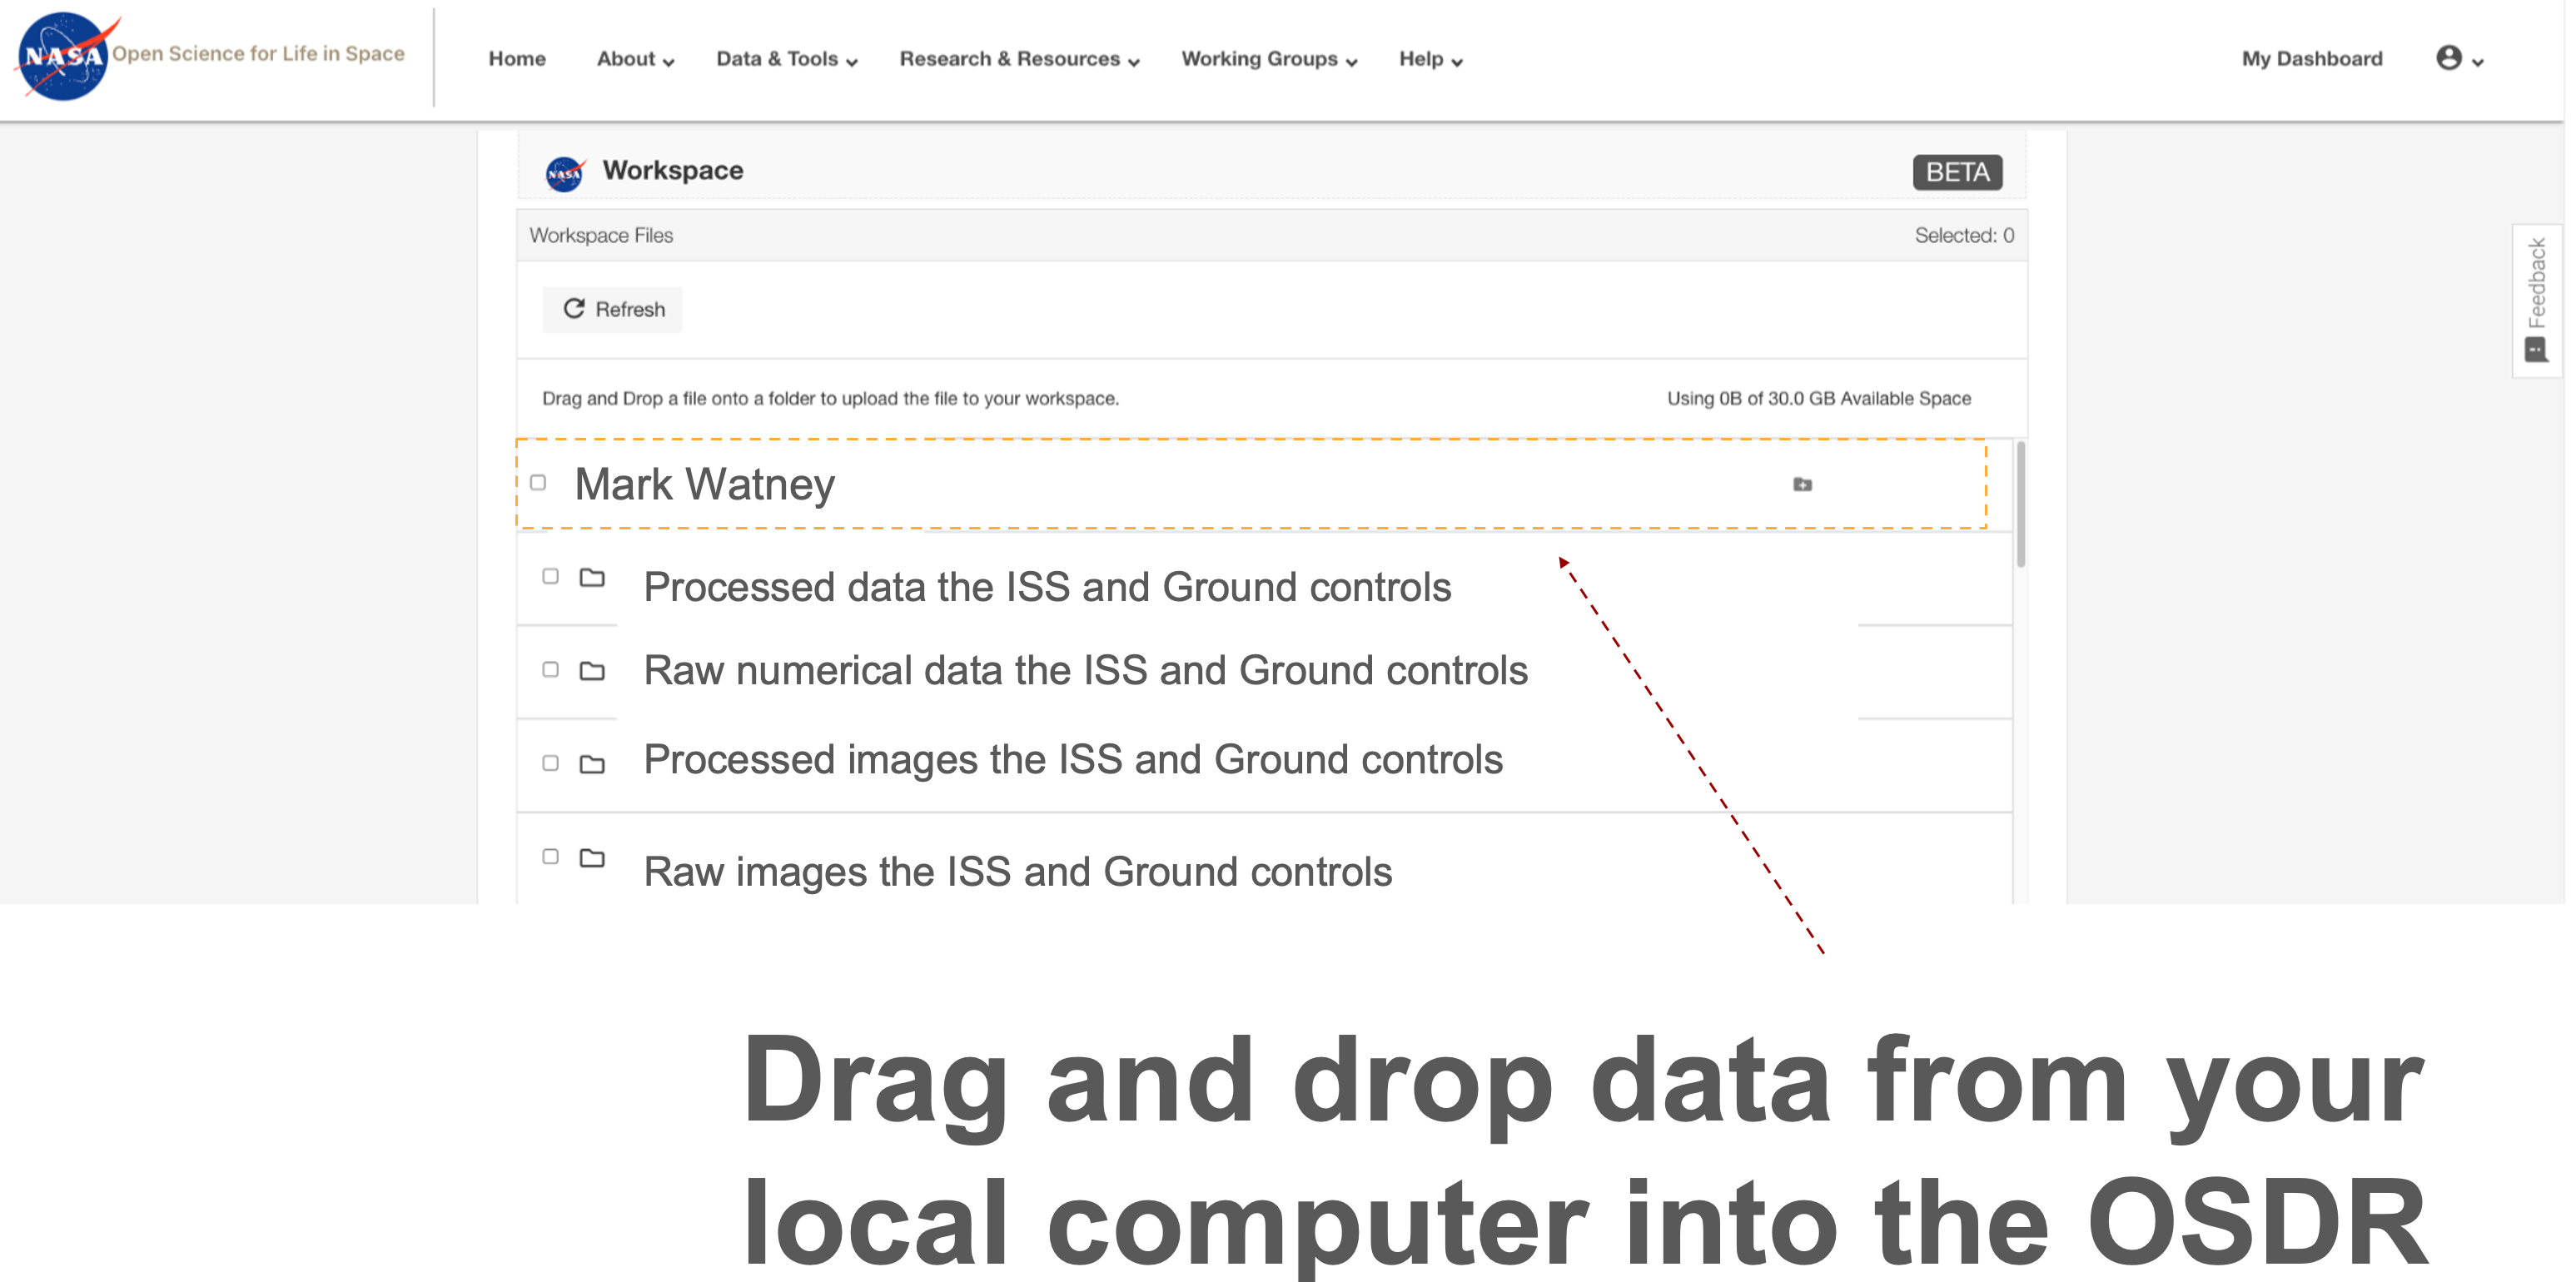
Screenshot showing an OSDR user workspace environment. In this folder, the user “Mark Watney” has a home folder that contains the raw and processed data from a spaceflight-related mission. The red arrow highlights how the user can simply drag and drop their data into their workspace from their desktop computer.
Associate data with an OSDR archive:
8.6. Once you’ve created an OSDR study and provided a basic summary you’ll want to associate the raw data files in the workspace to a “resource category”.
Assuming you’ve already drag and drop the data files to your Workspace folder, this can be achieved by selecting the file(s) and assigning it an ontology-guided resource category, this then provides the subsequent options of resource subcategories. After defining the data resources metadata the user can then associate it with their study.
In this example we can see “Mark Watney” has selected “Raw image files” and then the appropriate Resource Category/Subcategory which would be “Raw image file”, so the user can select the type of data they want to associate with their study. Click to confirm that all the files are associated.
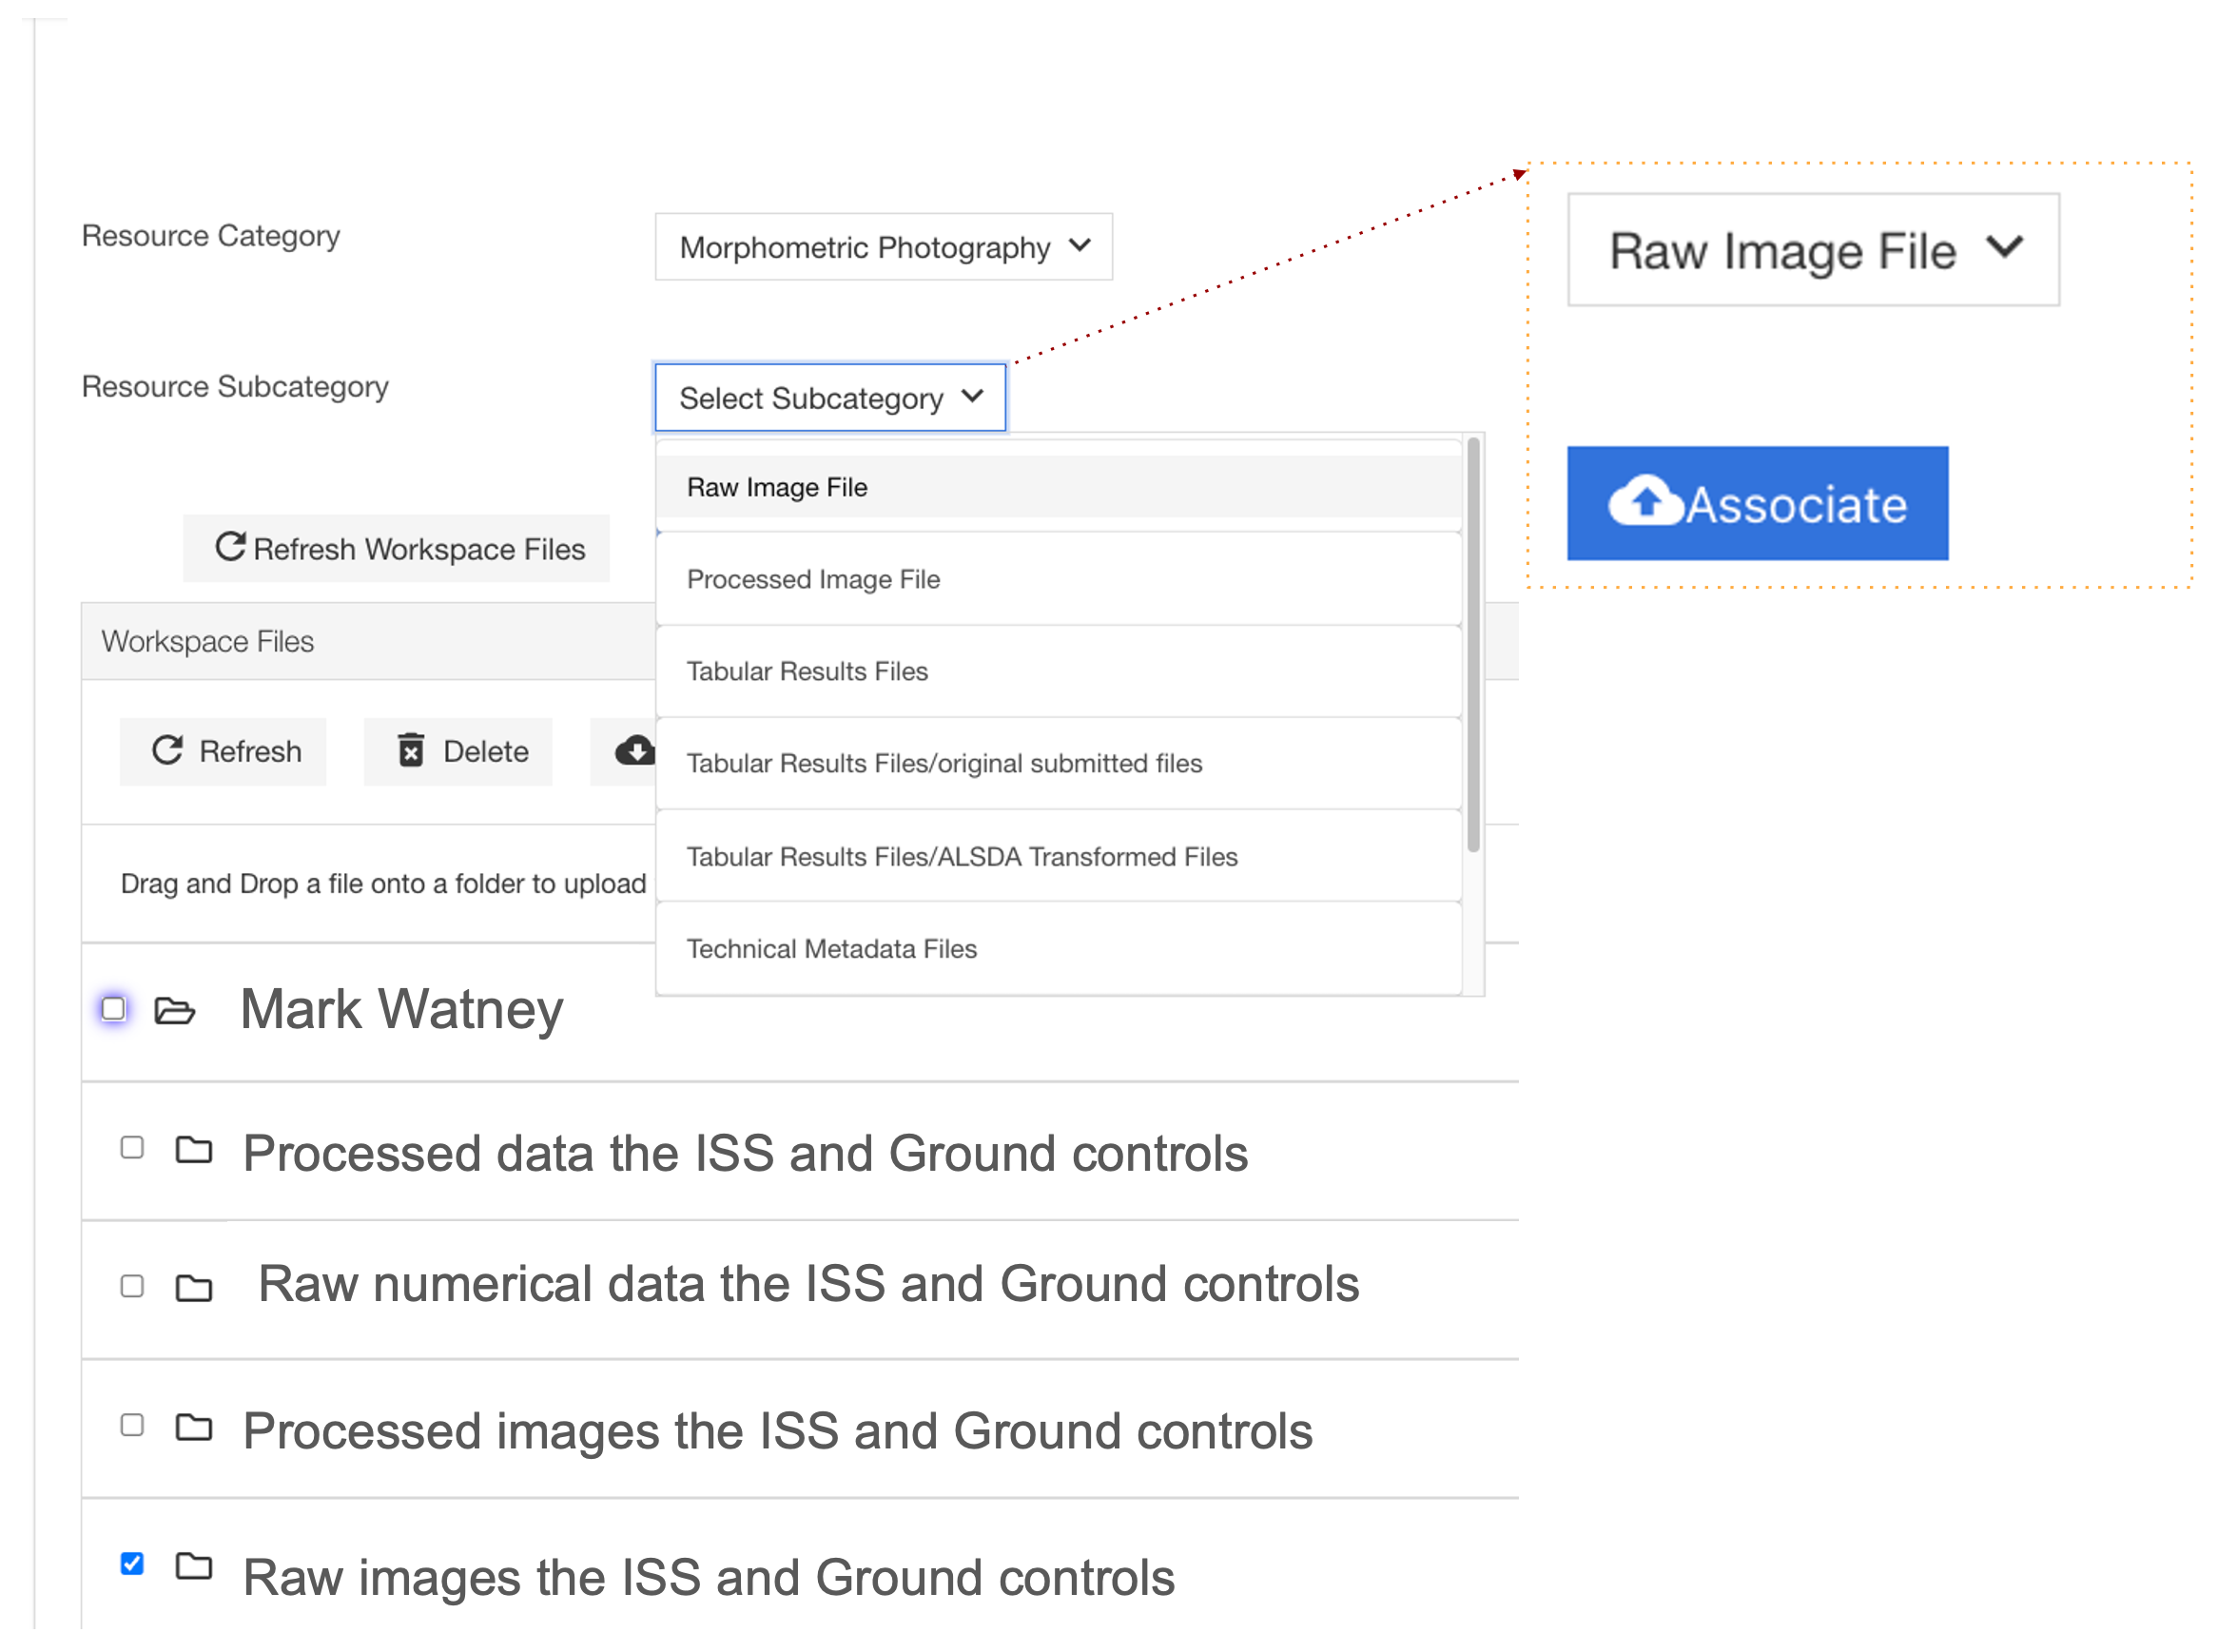
Screenshot showing how users can associate their raw data with metadata resources category. Most categories have subcategory that also needs to be defined. After selecting the data subgroup the user can then associate their raw data with this ontology term. A red arrow highlights that after selecting the subcategory associated with their data they can then click on the blue associate button to link their data to their OSDR study repository.
My Dashboard & Preview
9. You can preview the study by clicking next to My Dashboard in the top right corner anytime.
The preview button allows users to create a demo OSDR page, the preview page reflects the latest version of your OSD-# page so remember to save the metadata before viewing it. A read-only preview link will also be provided for you to share with your reviewers and/or journals. Use the arrow pointing down to access their account and potentially choose to log out.
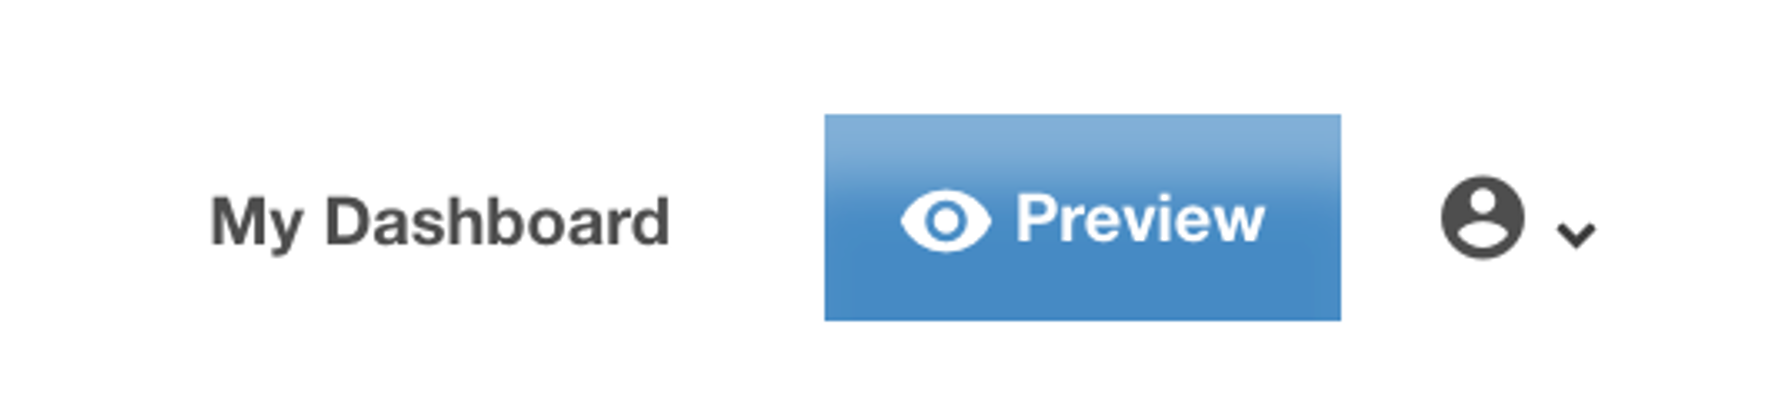
The top right corner of the screen has buttons for viewing the study dashboard, creating a demo OSDR page, and accessing account settings or logging out. The preview button makes a demo webpage that allows to view what your OSDR study page will look like after you make it public.
Study Status Review
10. Complete metadata validation can take some time to achieve
The Open Science Data Repository (OSDR) provides a data curation team dedicated to assisting researchers in ensuring the quality and completeness of their metadata entries. This team is available to review and provide guidance on metadata, ensuring that it meets the required standards and best practices.
To initiate the data curation process, researchers can select the “Study Validation” tab within the OSDR platform and click on the “Submit” button. This action triggers a validation test that summarizes the status of the repository, providing valuable insights into any potential issues or areas requiring attention or the addition of more information.
Once the validation test is complete, the status of the study in the left panel will change to “In Curation” or another relevant status, such as “Submitted.” During the curation process, the OSDR curation team will thoroughly review the study metadata, ensuring its accuracy, completeness, and compliance with the repository’s standards.
It’s important to note that once a study enters the curation status, researchers will temporarily lose the ability to make changes to the metadata. This is to ensure the integrity and consistency of the curation process. The OSDR curation team will contact researchers if any missing information is identified or if changes are needed to meet the repository’s curation standards. After the curation team has completed their review, researchers will receive the updated metadata for the final review. This provides an opportunity for researchers to verify the changes made by the curation team and ensure that the metadata accurately represents their study.
*Alt text: Screenshot highlighting that on the left of the page is a “status” box, clicking on the validation button causes the OSDR to scan the repo and provide reports on how complete the meta-data fields are. By leveraging the expertise of the OSDR data curation team, space biology researchers can benefit from a streamlined and efficient curation process. The team’s guidance and support ensure that metadata is of the highest quality, facilitating data discovery, reuse, and reproducibility in the scientific community._
Contact us
If you have any questions or issues, please contact us at arc-dl-osdr-help@mail.nasa.gov.
The default quota of the Workspace account is 30GB, please reach out if you need more space.
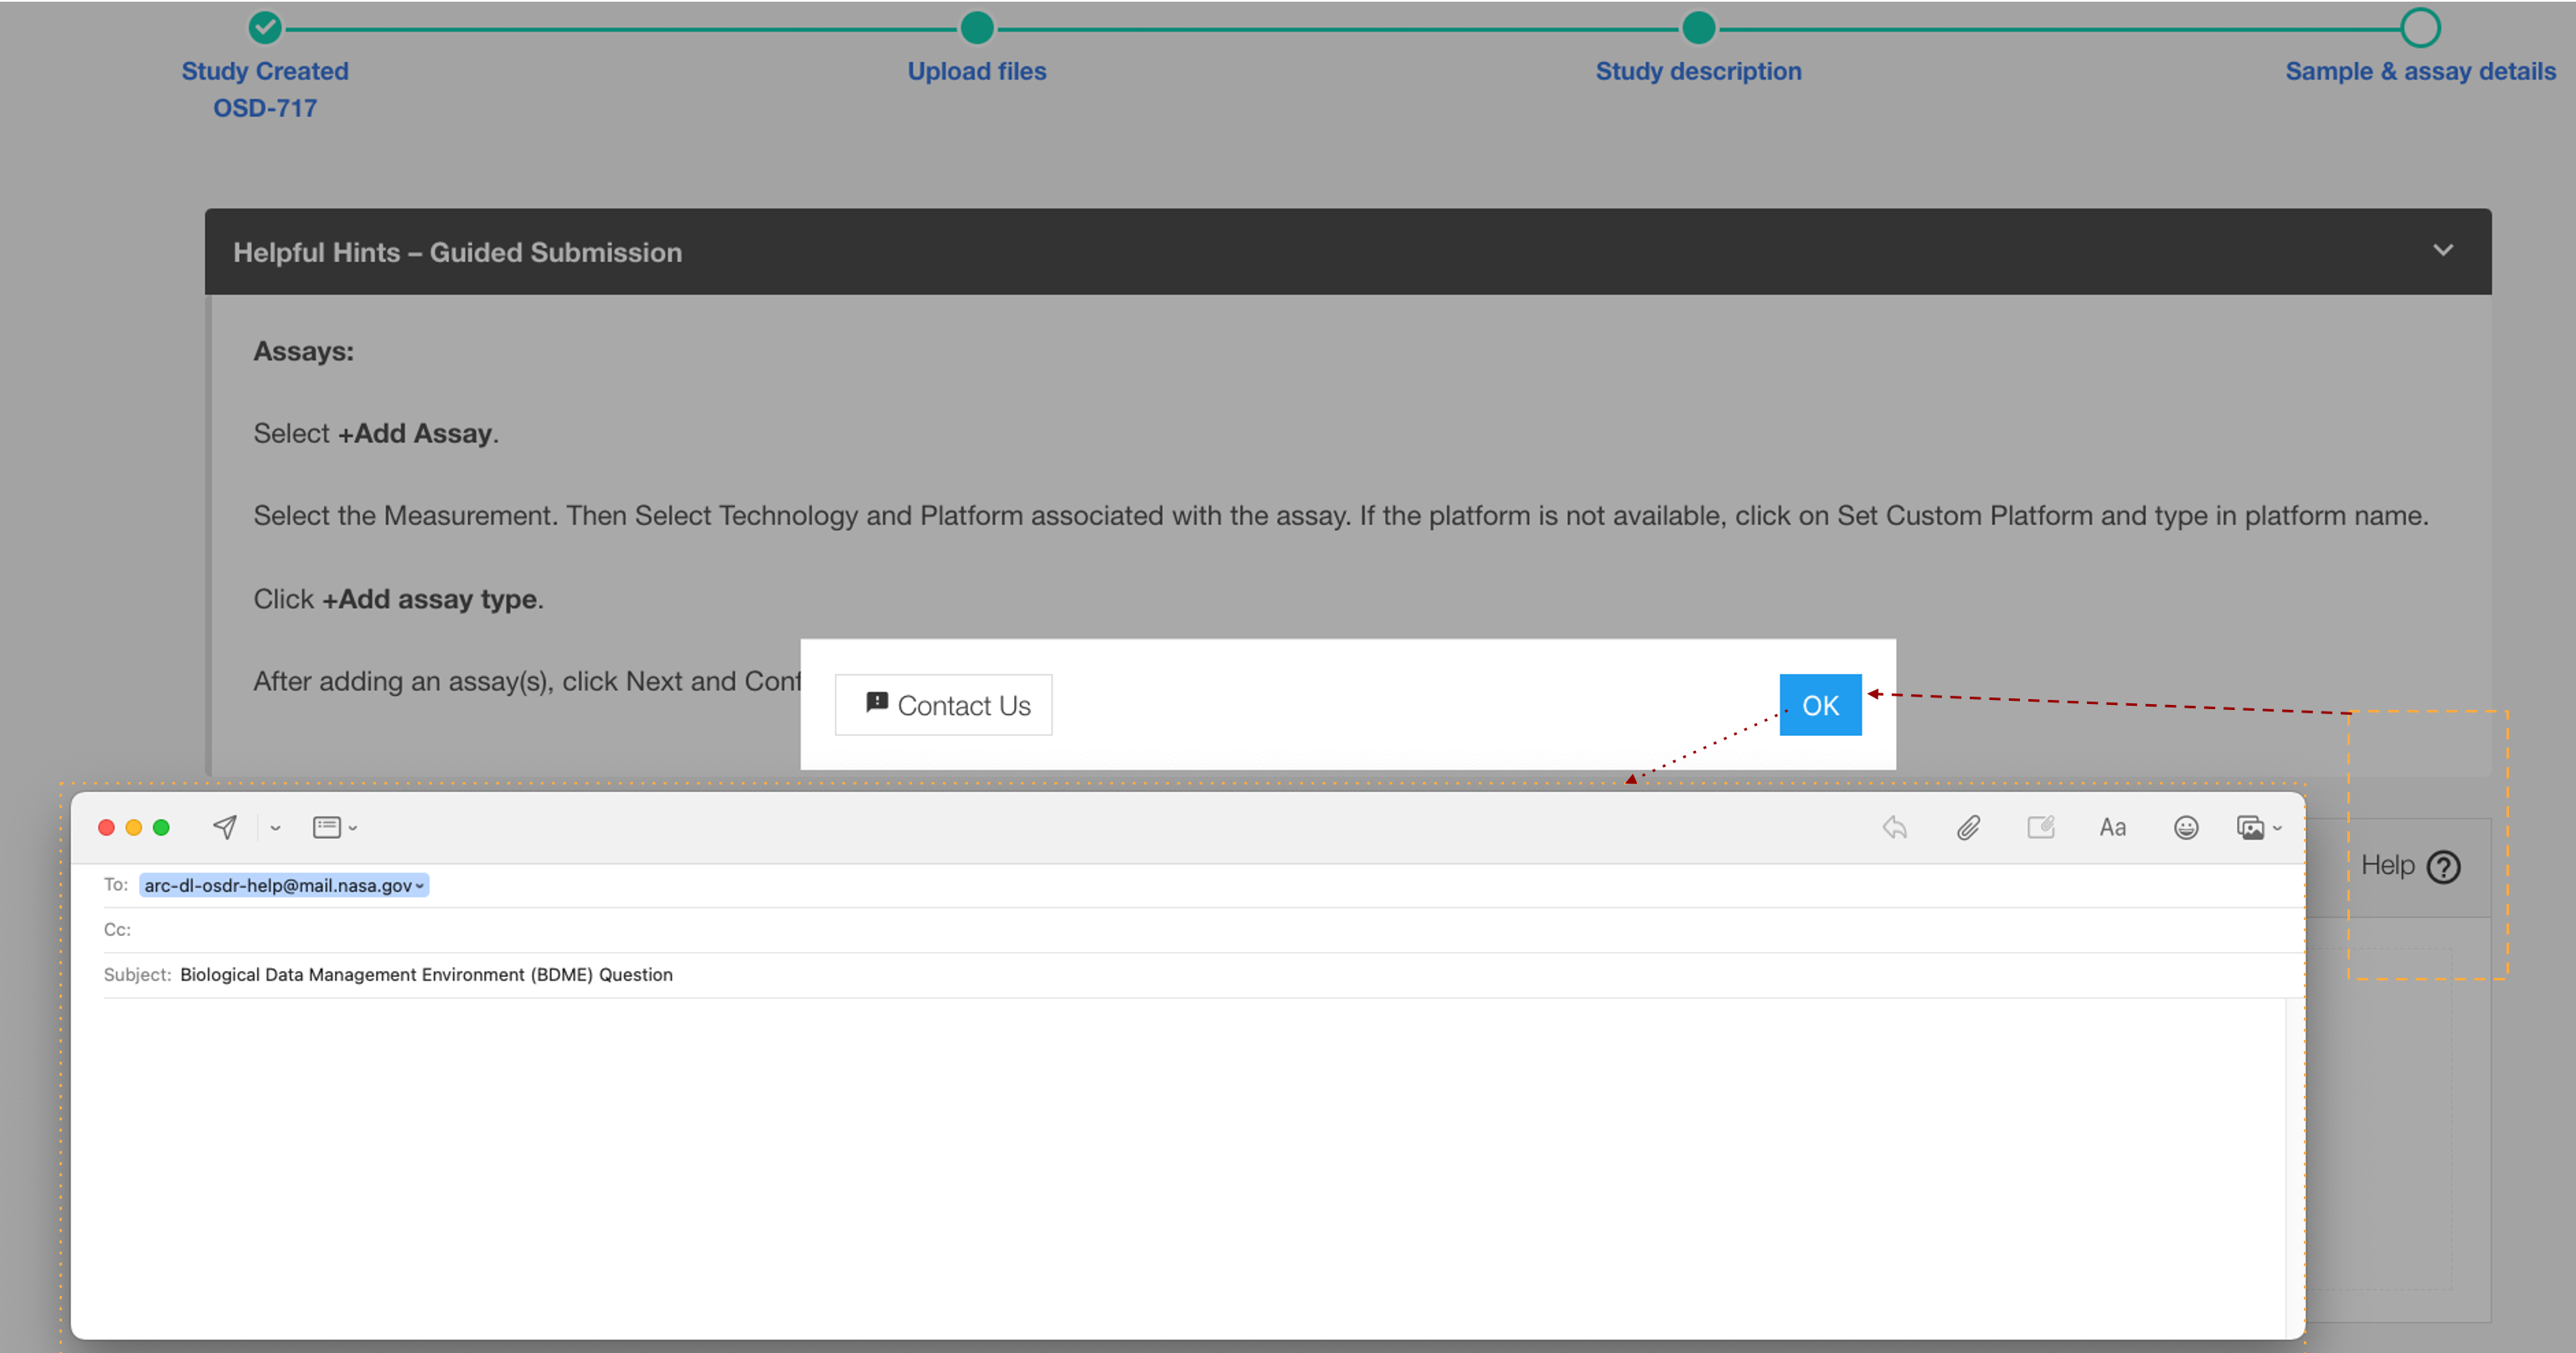
Screenshot showing how to create a e-mail to contact the OSDR. An orange box highlights the help button, then red arrow show how a popup box will automatically start an email conversation with the annotation team.